If you’ve been thinking about trying out Tor to anonymise all your web browsing, you could just download a browser and give that a spin, but it’s much more fun to make your own highly portable proxy that you can easily connect to on a whim. Enter the Raspberry Pi.
Tor is one of the easiest ways to browse the internet anonymously, though it does come at the cost of speed. In fact, it’s so absurdly slow that it’s pretty difficult to use for basic internet browsing. But that doesn’t mean it isn’t useful for other things, and since you likely don’t want to use it all the time, a quick way to switch between Tor and the regular internet is handy.
The Raspberry Pi can help here. First you need to turn a Raspberry Pi into an access point, much like a Wi-Fi hotspot, and then you install Tor on it so all the traffic that goes through that access point is anonymised.
When you want to use Tor, you just connect to the Raspberry Pi’s Wi-Fi network. When you don’t, you can use whatever network you use usually. The Tor Browser is always an option too, but you might not want to install software on all your devices. This is also nice to keep around the house if you’re the resident “tech person” because it makes it extremely simple to show someone what life would be like if they actually decided to use Tor for their browsing (it would be slow).
What You Need
You don’t need anything special to make a Tor-powered Pi proxy, but you will need to round up a few materials before you get started:
- Raspberry Pi 3
- Micro USB power supply
- Ethernet cable
- 8GB MicroSD card
- Access to your home router
- Mouse/keyboard/desktop computer for the initial set up process
You’ll want to go ahead and set up your SD card with Raspbian and set up SSH as well. You can use either the standard version of Raspbian or the Lite version, as you’ll only be using the command line for this guide. Follow our guide here to set up Raspbian (be sure to change your default password during this process) and this guide to enable SSH if you want to talk to your Raspberry Pi from any computer on your home network. Once you’ve gathered everything together, make sure your Raspberry Pi is connected directly to your router with an ethernet cable, then go ahead and plug it in.
Step One: Install the Necessary Software
The first thing we’ll need to do is make the Raspberry Pi 3’s Wi-Fi capable of acting like an access point. This turns it into a hotspot so you’ll be able to connect to it from your main computer just like you would any wireless network. We’ll be doing all this from the Raspberry Pi’s command line:
-
Type in
sudo apt-get updateand press Enter. -
Type in
sudo apt-get install iptables-persistent git -
Select
Yesand press Enter the two times you’re prompted to.
Now that everything’s been downloaded and installed, it’s time to set it up.
Step Two: Turn Your Raspberry Pi Into An Access Point

The process for turning a Raspberry Pi into an access point is a bit complicated, but thankfully GitHub user harryallerston created a script that automates the whole process.
-
Type in
git clone https://github.com/unixabg/RPI-Wireless-Hotspot.gitand press Enter. -
Type in
cd RPI-Wireless-Hotspotand press Enter. -
Type in
sudo ./installand press Enter. This starts the installation process. -
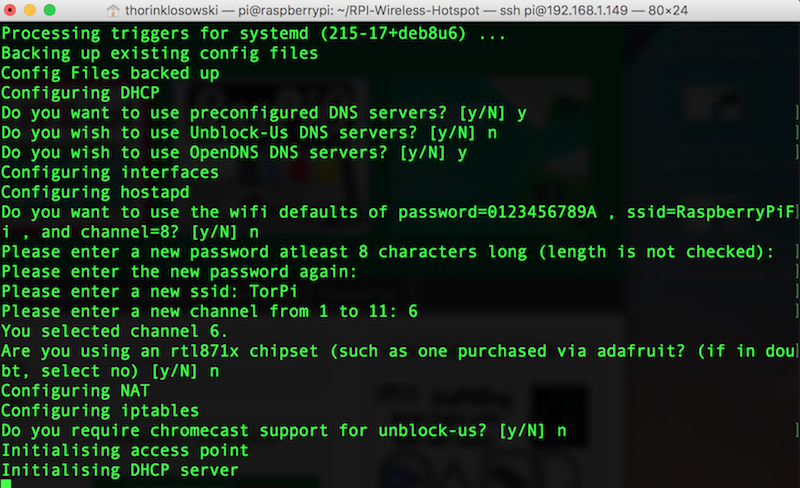
Press
Yto agree to the terms,Yto use preconfigured DNS server,Nto using Unblock-Us servers,Yto using OpenDNS, thenNfor the Wi-Fi defaults. - When prompted after the default question, enter a new password. This is the password to connect to your Pi-powered network.
- When prompted, enter a new SSID, this is the name of your network.
-
Enter a channel number.
6is fine, unless you know you need something else. -
Enter
Nfor the rest of the questions.
Once it’s complete, your Raspberry Pi will reboot and should now work as an access point. You can test this out by heading to another computer or phone, selecting your Raspberry Pi from the Wi-Fi network list, and seeing if the internet works. If for some reason it does not, Adafruit has a guide for doing this all manually. Otherwise, continue on and install the Tor proxy software.
Step Five: Install TOR

Tor has a pretty straight-forward set up process, but you’ll still need to tweak a few things to get it working.
-
Type in
sudo apt-get install torand press Enter. -
Type in
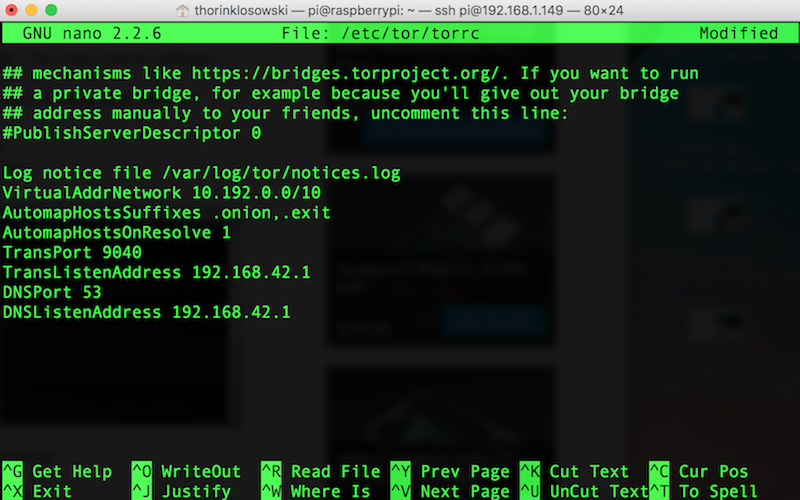
sudo nano /etc/tor/torrcand press Enter. Scroll all the way to the bottom of the document and enter the text below into the text file. When you’re done, press Ctrl+X to save and continue:
Log notice file /var/log/tor/notices.log
VirtualAddrNetwork 10.192.0.0/10
AutomapHostsSuffixes .onion,.exit
AutomapHostsOnResolve 1
TransPort 9040
TransListenAddress 192.168.42.1
DNSPort 53
DNSListenAddress 192.168.42.1
Next, you need to tell the Wi-Fi interface to send internet traffic through the Tor software. This happens with a few commands:
-
Type in
sudo iptables -Fand press Enter. -
Type in
sudo iptables -t nat -Fand press Enter. -
Type in
sudo iptables -t nat -A PREROUTING -i wlan0 -p tcp --dport 22 -j REDIRECT --to-ports 22and Press Enter. -
Type in
sudo iptables -t nat -A PREROUTING -i wlan0 -p udp --dport 53 -j REDIRECT --to-ports 53and Press Enter. -
Type in
sudo iptables -t nat -A PREROUTING -i wlan0 -p tcp --syn -j REDIRECT --to-ports 9040and Press Enter. -
Type in
sudo sh -c "iptables-save > /etc/iptables.ipv4.nat"and press Enter.
Now, it’s time to finally start Tor. Type in sudo service tor start and press Enter. Then, type in sudo service tor status to make sure it’s working properly. If you don’t see any error codes, it’s working. You can set it up to launch automatically at startup by typing in sudo update-rc.d tor enable then pressing Enter.
When that’s finished, go ahead and reboot one more time. Type in sudo reboot and press Enter. Your Raspberry Pi should now launch everything automatically on startup.
Step Five: Connect and Browse with Your New TOR Proxy

Now, all you need to do is connect any device you want to browse anonymously on to your new Raspberry Pi Wi-Fi network. Both your regular home Wi-Fi and this one will exist, so select this as you would any Wi-Fi network. When you’re connected, head to https://check.torproject.org/ to verify that you’re on the Tor network. Enjoy your slow, but anonymous internet!

Comments