

In this article, I will show you the painting tips for MASKED MODELER's original garage kit, Ayukawa Hiyori.
Many people may ask, "How can I paint a 3D printed garage kit? The conclusion is that it is no different from a traditional garage kit.
3D printed garage kits are easier to build than traditional garage kits in many ways, such as the fact that they have good paint adhesion and the paint does not peel off even without using primer.
Please refer to the following article for more information on the characteristics of 3D printed garage kits and how to build them. ↓↓↓↓

Painting Tips

When I do gradation painting, I make two or three colors as follows.
(1) Light color
(2) Intermediate color
(3) Shading color
The procedure is as follows.
(1) Paint the light color evenly.
(2) Overlay the intermediate color, leaving some of the light color intact.
(3) Overlay the shading color to emphasize the shadow area.
The Intermediate colors and the shading colors are mixed with gloss clear to facilitate gradation.
Tools used
Nozzle diameter 0.3mm airbrush
I use it to paint primer and clear evenly.
Nozzle diameter 0.18mm airbrush
It is possible to spray paint narrower than 0.3 mm, which allows for delicate gradation painting.
This is a popular compressor set that is used by many modelers.
It is convenient to adjust the air pressure of the airbrush at hand.
【Paint thinner】
The dilution ratio is paint 1: thinner 2.5. This may increase or decrease depending on the condition of the paint.
【Matte Top Coat】
EX Flat Clear Premium + Flat Base Smooth
I use it to finish the parts after painting and decal application. The dilution ratio is the clear 1: thinner 4. Spray a thin layer on the parts 4-5 times and adjust to get the desired matte finish.

You can learn more about garage kit painting on Youtube if you want to deepen your understanding.
Color Scheme

The skin tone have been painted using the Clear Skin Tone Method that utilizes the white of the resin parts. If Surfacerless Flesh Pink is not available, mix Clear Pink or Clear Orange from other companies as an alternative.
After I matted the faces, I painted the cheeks with Weathering Master Figure (H) Peach, and drew highlights with Enamel Flat White.

【Hair】
(1)Base White 1000 + Coral Pink
(2)Coral Pink + gloss clear
(3)Natural Brown + Maroon + gloss clear
The parts are large, so it is ideal for practicing hair painting. For the light color, I used Base White 1000, which also serves as a primer, but any white can be used.
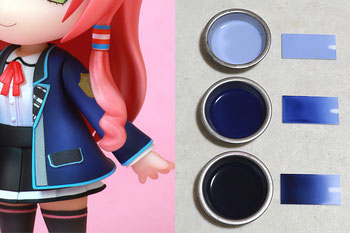
【Jacket】
Standard color: Ultra Blue + Primary Magenta + Black
(1)Base White 1000 + the standard color
(2)The standard color + glossy clear
(3)The standard color + black + glossy clear
Line: White + Ultra Blue
Gray: Neutral Gray II
Black: Neutral Gray IV + Black
First make the reference color, and then separate them and make (1), (2), and (3).
The hair clips, check patterns, pockets, and emblem are decals.

【Skirt】
(1) Neutral Gray III + Red Brown
(2)Black + gloss clear
Line: White
【Socks】
(1) Neutral Gray IV
(2)Black + Clear
Line: Brilliant Pink + White
Shoes: Black
The shoes are all painted with a brush. Before painting the socks, mask the shoes and paint them in the order of white, pink, and black for a clean finish.

【Sunflower】
(1) Sunshine Yellow + White
(2) Sunshine Yellow + glossy clear
(3) Draw the details with Enamel Orange.
Center of flower: Red Brown + white
Leaf: Green + White
【Taiyaki】
(1) White + Orange Yellow + Red Brown
(2)Draw the details with Enamel Brown.
If you draw the details of the sunflower and Taiyaki with enamel orange and brown, you can get much more better finish.

These are Hiyori's partner, Ultimate Nippers and 0.18mm airbrush. If you use black as a base coat before painting the silver, the metallic luster will increase. The nippers were finished with a brush.
How to apply decals

If the decals do not adhere to the curved surface of the parts, press a cotton swab soaked in boiling water against them to soften and make them easier to apply. If you prepare hot water in a pot or a vacuum flask, it will make your work faster.
If it does not adhere well even using hot water, try to use Mark Setter.
To be frank, the line decals are quite difficult to apply, so I think it would be faster and cleaner to mask and paint.

(1) Soak the decal in water.

(2)Wait for a minute or two, and when the decal starts to lift off the base, pick it up with tweezers and lift it off. I recommend using precision tweezers when applying decals.

(3)Place the decals on the part and align them.

(4)If the decals dry out and become difficult to move, add water with a dropper. Be careful not to try to move the decals when they are dry, as this will cause them to tear.

(5)If the decals do not adhere to the curved surface of the part, press a cotton swab soaked in boiling water against them to soften and make them easier to apply.

(6)I felt that the whites of the eyes were a little too big, so I cut a little bit of the whites of the eyes with a hobby knife.

(7)This is a comparison of before and after correction. The difference is subtle, so if you don't mind, please use it as it is.

【Attention!】
(8)I felt the whites of the eyes of the frontal face decals also a little too wide, so I cut them out with a knife. When cutting out the whites of the eyes, either make the cuts before dipping the decal in water, or let it dry well after applying it. Be sure to use a new, well-cut blade.

(9)Before soaking the jacket pockets and hair clips in water, cut out the margins of the decals as shown in the red lines, so that they fit perfectly with the parts and are easy to apply.
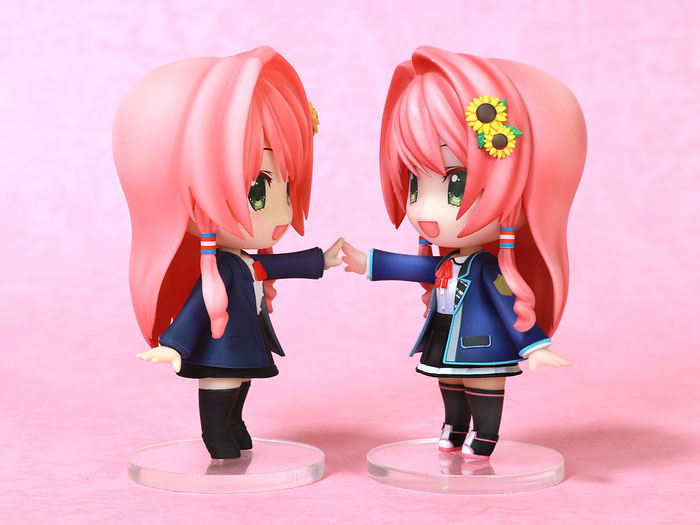
Sample photos


The above is the painting method of the sample, but I know many people find it difficult, so I will also show you the "Easy Finish" color scheme.
Easy Finish color scheme


【Skin tone】 Surfacerless flesh pink
【Hair】(1) Coral Pink + White (2) Coral Pink
【Jacket】 Iron blue
【Blouse】 White
【Ribbon】 Bright red
【Skirt, socks and shoes】 German gray
【Sunflower flower】 Sunshine yellow + white
【Sunflower center】 Red brown + white
【Sunflower leaves】 Green + White
The Easy Finish is painted with a 0.3mm nozzle diameter airbrush.
Only the hair is painted with two colors, but the rest is single color.
If you are a garage kit beginner, try to complete it using the Easy Finish as an example.
The painting method of the sample requires a lot of work, but it looks great when it's done, so give it a try!


Ayukawa Hiyori
An energetic girl who strives to become a professional modeler.
As long as she can build models, she is happy every day.
She loves to nibble on the mold lines of Taiyaki.


コメントをお書きください