In this tutorial, I will be going through the steps on how to set up a Raspberry Pi VPN server using the OpenVPN software.

I will also go into setting up various things you must do to ensure that your connection is as secure as possible by setting up encryption keys.
This project can be a bit of a long process, but it is a relatively simple tutorial to follow, and shouldn’t require any extra interaction once it has been configured.
Using a Raspberry Pi is a cheap way of setting up a virtual private network (VPN) that can stay online 24/7 without consuming a large amount of power.
It’s small and powerful enough to handle a few connections at a time making it great for private use at home.
VPN’s are an incredibly useful network tool that can allow you to gain access to encrypted and secure internet traffic even when you are utilizing public Wi-Fi.
As an added bonus, you can also use it to allow yourself to connect to your own computer and access the home network. It allows your other devices that are located outside your local network to act as if they were on the local network of the VPN Server.
For example, if you had a network attached storage server that you wanted to access while away, then a VPN server will be extremely handy in achieving a secure way to access it.
Equipment List
Below are all the bits and pieces that I made use of for this Raspberry Pi VPN server tutorial, there is nothing super special that you will need to be able to complete this.
Recommended
Optional
Video
In the video below, we walk you through the process of setting up a VPN on our Raspberry Pi using the OpenVPN software.
If you run into any issues, be sure to check out the written version of our VPN guide below.
Adblock removing the video? Subscribe to premium for no-ads.
Getting Prepared for your VPN server
Before we get started with setting up the Raspberry Pi VPN server there are a few things we must go over to ensure that you are ready to set it up and use it.
Firstly, for this tutorial, it’s important to know that I am using a clean version of Raspbian. If you haven’t installed it and would like to learn how then my guide on installing Raspbian is extremely handy if you’re new to all this.
For starters, make sure you actually do need a VPN before you start setting this up, as it can act as a gateway into your home network.
If you do intend on using a VPN make sure all the computers on your home network are secure, and that you aren’t sharing anything within your local network that you wouldn’t want someone gaining access to.
Preparing your VPN Server’s IP Address
It’s important to decide whether you are going to make use of a static IP address or a dynamic IP address, setting up a VPN for a static IP address is a rather simple process and requires no extra work.
However, if you want to utilize a dynamic IP address, you must make use of a dynamic DNS service.
If you choose to go down the dynamic DNS service route, then you should decide whether you want to make use of your own domain name or a free one.
If you want to make use of your own domain name, then you can use a service like CloudFlare, if you’re going to make use of a free subdomain then a service such as no-ip.org will be useful for you.
You can check out our guide on setting up your Raspberry Pi for Dynamic DNS for more information.
Remember the domain name that you set up for either Cloudflare or no-ip.org as you will need this later on in the tutorial.
Port Forward for your Raspberry Pi VPN
The third important thing that you will need to get done before you start setting up your Raspberry Pi is to port forward for the OpenVPN software.
The default port you need to forward is 1194. Remember the port you set as you will need this later on in the tutorial. The protocol you will have to make use of for this port is UDP.
If you are unsure on how to port forward on your router, we recommend looking your router up over on port forward.
Installing the VPN Server
1. Setting up a Raspberry Pi VPN Server can be quite a complicated process, normally you would have to install the software, generate the encryption keys, add the port to the firewall, set the Pi to keep a static IP address and much more.
Luckily for us, there is a much easier way to set up a Raspberry Pi VPN server thanks to an install script called PiVPN, this handles all the grunt work for setting up a VPN and reduces the potential for making mistakes.
Before we get started, we should first change the password of the default pi user, this is to ensure if someone managed to gain access to your VPN they wouldn’t be able to access your Raspberry Pi easily.
passwd2. With the password changed we can begin the process of setting up our VPN server on the Raspberry Pi. We can begin this process by running the command below, this command downloads the install script from PiVPN’s GitHub page and runs it.
Normally running a script straight from a URL is a poor idea, as it can be an easy way for someone to gain access to your Raspberry Pi and do some serious damage.
However this is a trusted source that we have verified, if you want to check out the code yourself, just go to the location of the script.
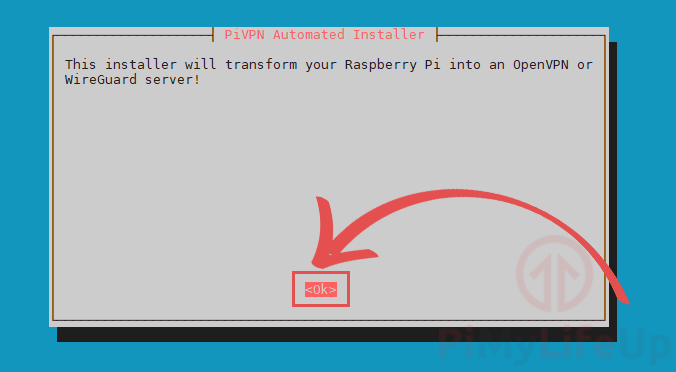
curl -L https://install.pivpn.io | bash3. Once you have run the above command, you should be met with the following screen. This screen will feature some text telling you that you are about to install OpenVPN.
To proceed to the next screen, you need to press the ENTER key.
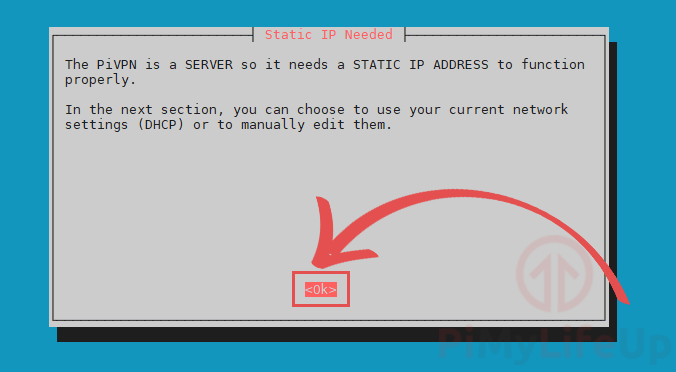
4. The next screen explains that you will need to set up a static IP address for your VPN.
This is so that when the Raspberry Pi is restarted, it will try and use the same IP address. If the local IP changes, you could potentially lose access to your VPN.
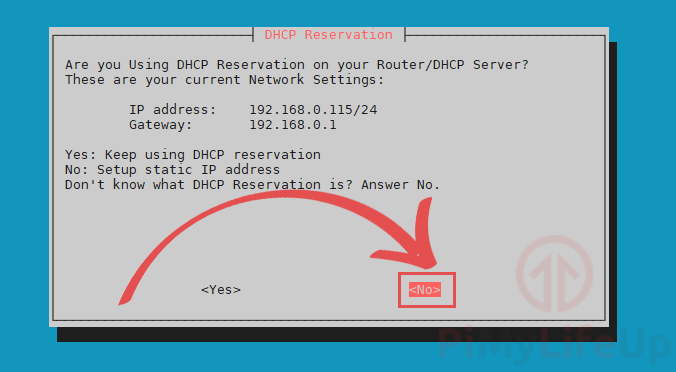
5. You will now be asked if you are using a DHCP reservation on your router.
If you don’t know what DHCP reservation is or how to use it, select <No> to continue.
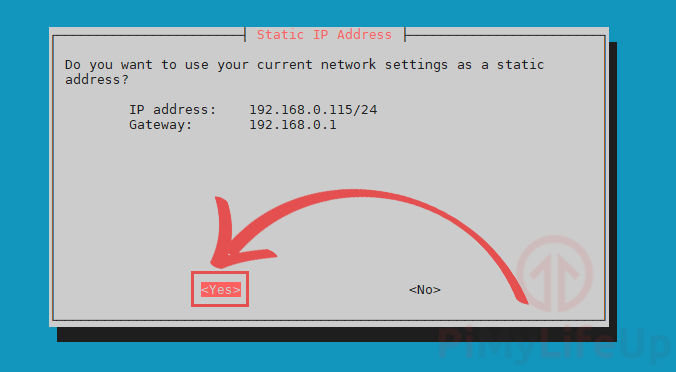
6. Here, select <Yes> to set the current IP address and gateway as static.
If you are unhappy with the IP address displayed on this page, then select <No>.
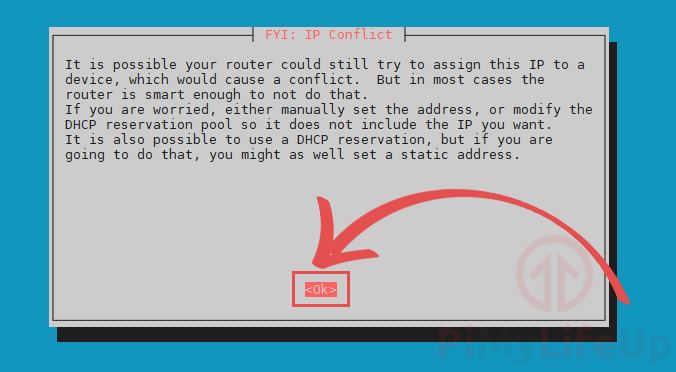
7. This screen warns you that there is a chance your router will assign the IP address to another device.
You can use DHCP reservations to avoid this. However, most routers are smart enough to prevent the problem.
To continue, select <Ok> and press the ENTER key.
8. This screen explains that we will need to set a user that will own the OpenVPN configuration files.
Select <Ok> and press ENTER to go to the next screen.
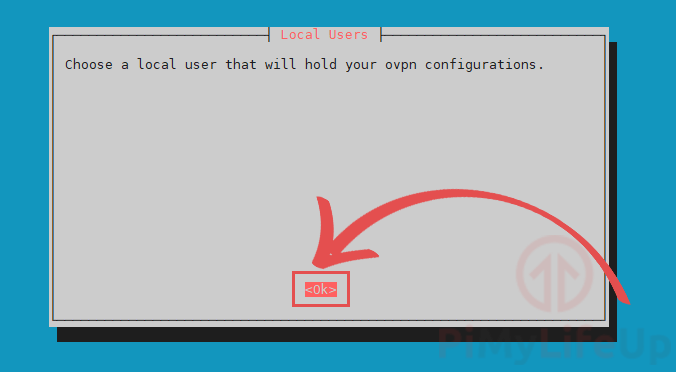
9. We will be presented with a list of users who can own our Raspberry Pi’s VPN config files.
In this tutorial, we will be making use of the pi user. If you want to use another user, use the ARROW keys and SPACEBAR to select it.
Once you are happy with your selection, press the ENTER key to continue.

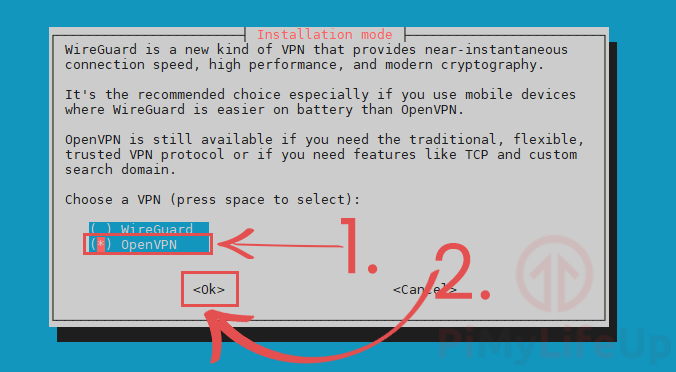
10. You will now be asked to select what type of VPN you want to install on your Raspberry Pi.
The two choices are WireGuard and OpenVPN.
For this guide, we will be using OpenVPN on our Raspberry Pi (1.). Use the ARROW keys and the SPACEBAR to select it.
Once you have OpenVPN selected, press the ENTER key to continue (2.).
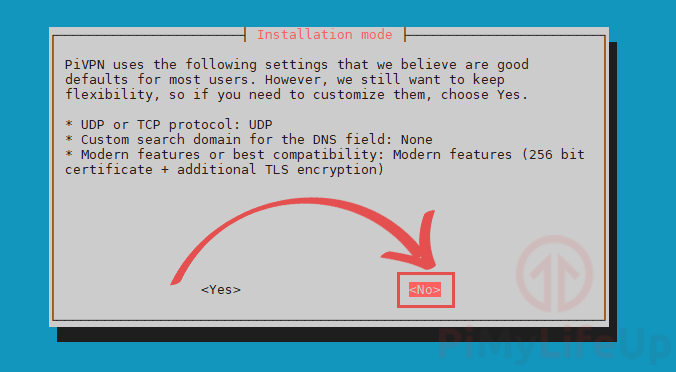
10. You can now decide whether you want to customize the installation of OpenVPN on your Raspberry Pi.
The setting chosen by the PiVPN team is best for most users. However, you can modify these if you like.
For our guide, we are going to stick with the default settings.
To continue, select <No>, then press the ENTER key.
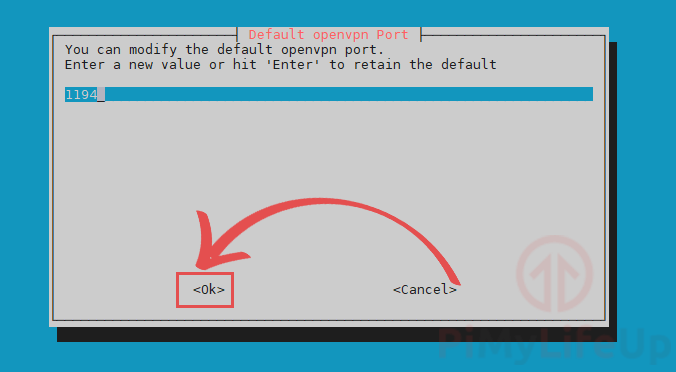
11. Now we will be selecting the port that OpenVPN will operate through.
For this tutorial, we are going to stick with the default port of 1194. You should only change the port if you have a good reason to.
Once you have defined the port, select <Ok> and press ENTER.
14. You will be asked to confirm the port that you set for your OpenVPN installation
If you are happy with the port you have chosen, then select <Yes> to continue.

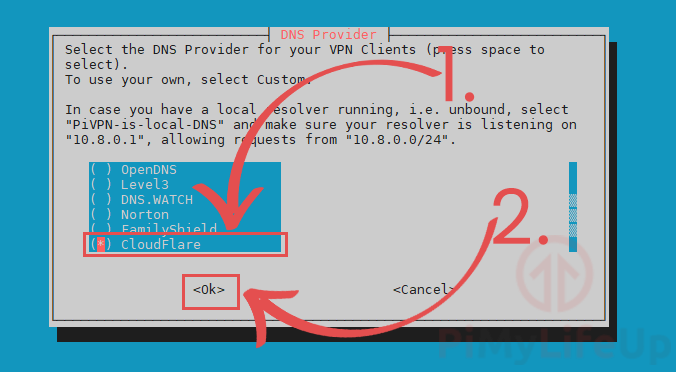
15. The next step is to select a DNS provider. A DNS provider is what resolves a URL like https://pimylifeup.com into an IP address.
Within our guide, we will be making use of Cloudflare’s DNS servers. Cloudflare wipes their logs every 24 hours and does not track the querying IP address.
To select Cloudflare or another DNS provider, you will need to use the ARROW keys (1.).
Once you are hovering over the DNS provider you want, press the SPACEBAR key to select it.
Once you are happy that you have made the right choice, you can press the ENTER key to proceed.
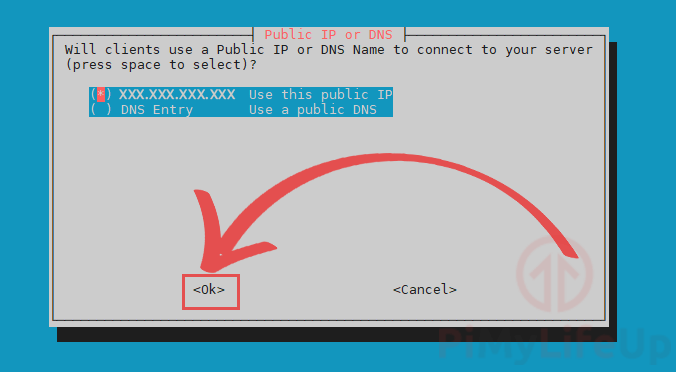
16. You will need to decide whether you want to make use of your public IP Address or a DNS name.
If you are using a dynamic IP address, we recommend using the public DNS name option. You can follow our guide on setting up dynamic DNS on the Raspberry Pi if you need assistance with this.
As we are using a static public IP address, we will stick with using our public IP address for this guide.
You can change between options by using the ARROW keys. Once you have the one you want, press the SPACEBAR key to select it.
17. This next step is just explaining to you that the PiVPN script is about to generate both the HMAC key and the server key.
These keys are part of what makes up the encryption part of your Raspberry Pi’s VPN.
Press the ENTER key to continue with the guide.

18. Now you will be presented with a simple explanation of unattended-upgrades.
This feature makes the Raspberry Pi OS automatically download security package updates daily.
Press the ENTER key to proceed to the actual configuration page for this setting.
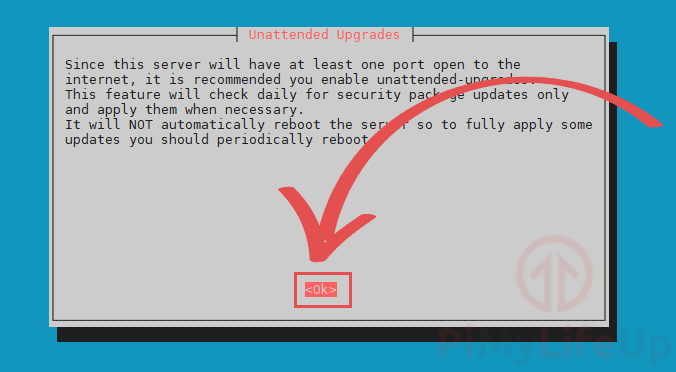
19. On this screen, we highly recommend that you enable unattended-upgrades by selecting <Yes>. Enabling this will ensure your Raspberry Pi should always have the latest packages.
Leaving this feature switched off can pose a significant security risk to your Raspberry Pi’s VPN and potentially your home network.
Once done, press the ENTER key to confirm your settings.

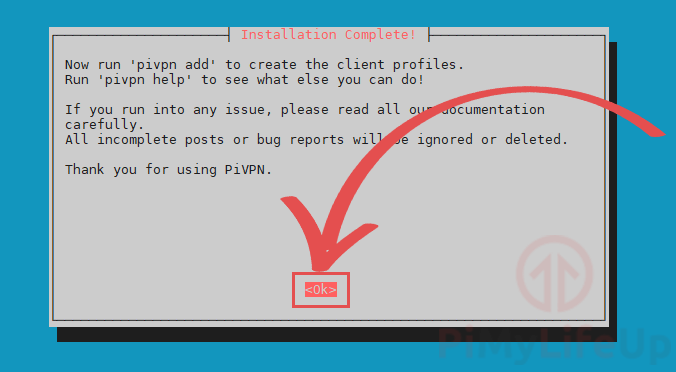
20. You have now completed the installation of OpenVPN on your Raspberry Pi.
While there are still a couple more things you will need to complete to allow connections, you are now about 90% through this setup guide.
21. We will now be greeted by a screen asking for us to reboot the Raspberry Pi.
Select the <Yes> option to the following two screens by pressing the ENTER key.
Rebooting your Raspberry Pi after installing OpenVPN is a crucial step.

Setting up your first OpenVPN User
1. Normally setting up a user for OpenVPN would be a painful process as you would have to generate the individual certificates for the user, luckily we can do this in one single command thanks to PiVPN.
To begin adding the user, run the following command:
sudo pivpn addOn this screen, you will need to enter a name for the client, and this name will act as an identifier so you can differentiate between different clients.
It will also ask you to set a password for the client, and it is important to make this something secure and not easy to guess as this will secure the encryption key.
So, if someone can guess the password easily, it severely reduces the security of your VPN.
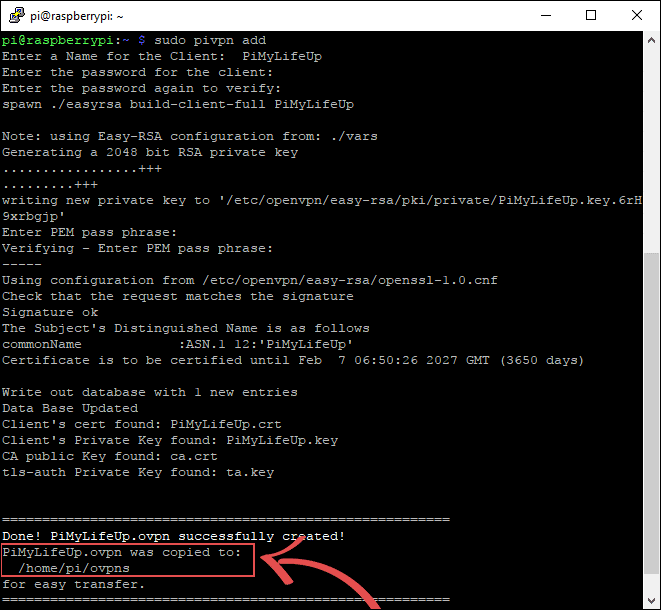
Once you press enter to these, the PiVPN script will tell Easy-RSA to generate the 2048-bit RSA private key for the client, and then store the file into /home/pi/ovpns.
/home/pi/ovpns is the folder we will have to gain access to in the next few steps so we can copy the generated file to our devices.
Make sure you keep these files safe as they are your only way of accessing your VPN.
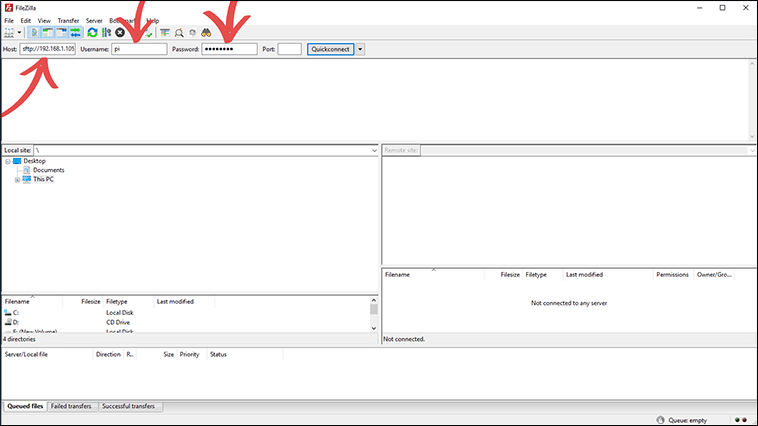
2. Now that our new client has been set up for OpenVPN with our passphrase we will now need to get it to the device that we intend on connecting from.
The easiest way to do this is to make use of SFTP from within your home network.
Make sure you have a program such as FileZilla that can handle SFTP connections installed before continuing with this tutorial.
To get started, let’s log in to our Raspberry Pi over SFTP. Remember to type sftp:// in front of your Raspberry Pi’s IP address.
If you don’t have you Pi’s local address use the command hostname -I in the terminal.
Once you have entered your IP address, Username and Password, press the quick-connect button.
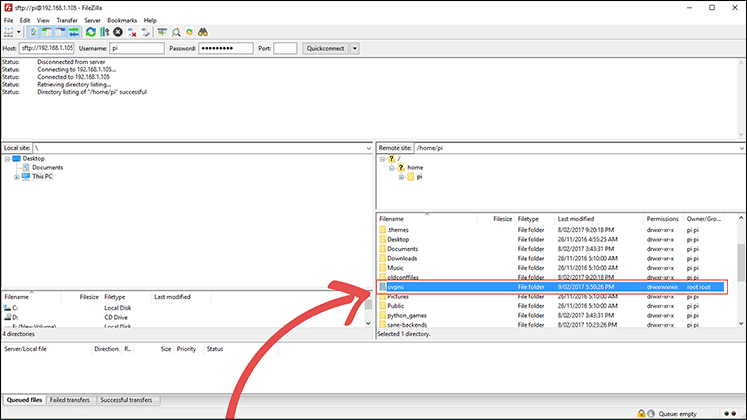
3. Once you have successfully logged in, we need to look for the ovpns folder, as this is where the file we need will be located.
Once you have found the folder, double-click on it.
4. Now, all we need to do is drag the .ovpn file you want to somewhere safe on your computer. This file contains the data that we will need to connect to the VPN so keep this file safe.
It is also the only way someone could potentially gain access to your VPN, so keeping the passphrase and the file secure is incredibly important.
If someone gains access to these, they could potentially cause some harm to your network.

5. Now we have the .opvn file on our device we can use this to make a connection to our VPN.
The .opvn file stores everything we need to make a secure connection. It contains the web address to connect to, and all the encryption data it needs.
The only thing it does not contain is your passphrase, so you will need to enter this when you connect to the VPN.
The client we are going to use is the official OpenVPN client, and you can obtain this from their official OpenVPN website.
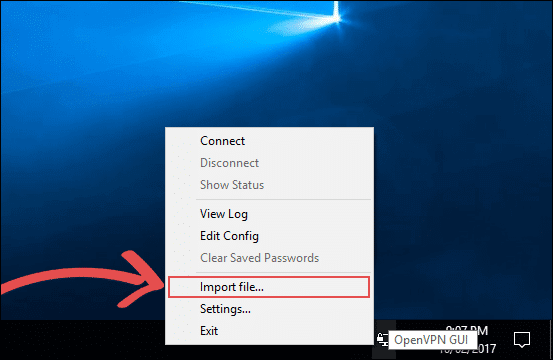
Download and install this client, on its first run it will automatically minimize to the taskbar, right click on the icon, then select “Import file…”
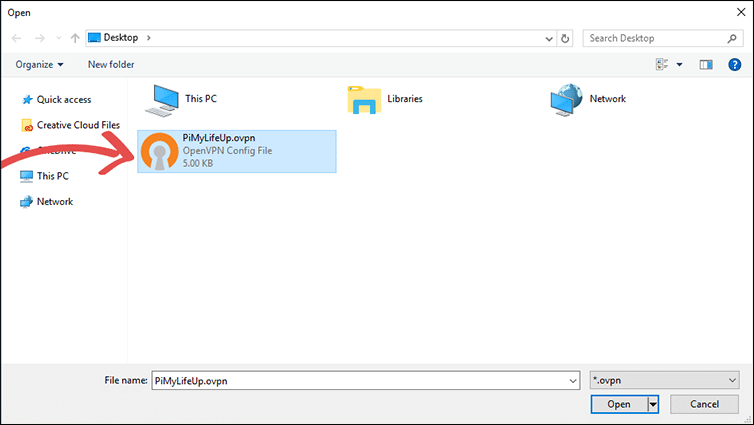
6. You will be presented with a file explorer screen, in here go to where you saved the .opvn file from earlier.
Once you have found it, double-click the file to import into the OpenVPN client.
7. You should now be presented with a dialog telling you the file has been successfully imported into OpenVPN.
Just click the “OK” button to proceed.

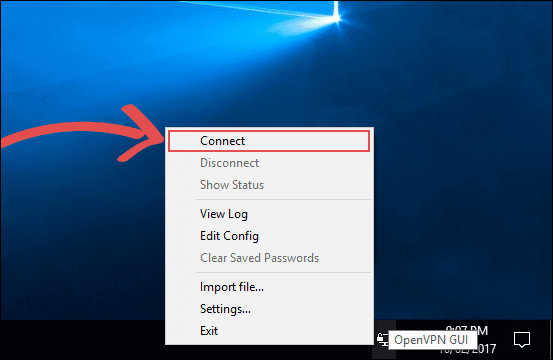
8. Now right-click the OpenVPN client icon in the taskbar again, this time click the “Connect” button.
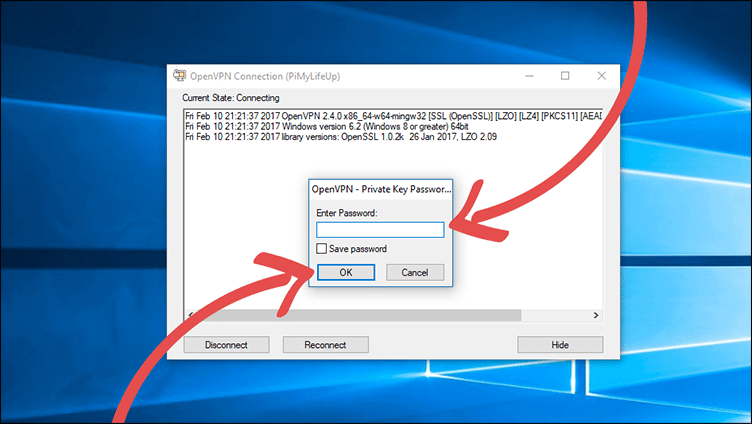
9. Now the OpenVPN client will attempt to read the data located in the .opvn file.
Since we have a passphrase set, it will now ask for you to enter the passphrase you set earlier on in this tutorial.
Once you are certain you have entered the correct passphrase, click the “OK” Button.
10. The OpenVPN client will now attempt to connect to your Raspberry Pi’s VPN server. If the OpenVPN icon turns to a solid green, then it means that you have successfully connected into your VPN.
However, if it turns yellow and fails to turn green after 60 seconds that means something is causing the connection to fail.
In most cases the connection failure is caused by port forwarding issues, my router, for instance, has numerous issues with port forwarding.
It is easiest to google your router’s model number to try and find help on any issues you may face with port forwarding.
Some ISP’s (Internet Service Provider) also block specific ports, so it’s best to check that your ISP is not blocking the port you plan on using.
If you are using a dynamic DNS service, then make sure that the service is being correctly updated with your latest IP address if the IP address has changed, but the DNS setting hasn’t then it will cause the connection to fail.
Hopefully, by now, you will have a fully functional VPN that you’re able to connect to successfully.
Uninstalling the VPN from your Pi
1. If for some reason you want to remove your VPN from your Raspberry Pi you can simply utilize the following command on it.
This command will utilize the pivpn software to uninstall the VPN tunnel.
sudo pivpn uninstallI hope that this tutorial has shown you how to set up a Raspberry Pi VPN Server and that you haven’t run into any issues. It’s certainly a great project for anyone who wishes to set up a cheap always-on VPN network.
If you have some feedback, tips or have come across any issues that you would like to share, then please don’t hesitate to leave a comment below.


Thanks Gus. I have just went through your instructions and have it working great on a Raspberry Pi 4B. I’m getting download speeds of 400+Mbps (my normal connection is 900Mbps) so that is really great. I chose WireGuard instead of OpenVPN though.
hello,
i have followed the steps to configure my no-ip.org free subdomain.
But in the setup on step 15, there is no option for no-ip.org.
Can someone please tell me how i would configure this?
Thanks!!
Hi Tom Wetzels,
You will be safe picking any of those five options. These are just for resolving DNS requests and not for handling your domain name itself.
To have a service such as no-ip.org continue to point at your IP address you will want to look into our guide that covers setting up dynamic DNs on the Raspberry Pi.
I hope this clears up your issue.
Cheers,
Emmet
worked like a charm! Thank you for this! Only part I replaced in this tutorial is the use of filezilla, with scp from CLI.
THIS TUTORIAL IS by FAR one of the BEST i ever read.
for real, so easy, i was able to connect from my cellphone to the vpn.
GREAT WORK!
I’m trying to find a tutorial for a next step on the VPN.
I already have the pi working as a server so I can access my NAS and so on for the outside but I also want to make the pi a client at the same time so it can serve as a vpn gateway for my devices at home.
On the computer is easy, just open ProtonVPN and it works, but devices like appletv can’t install vpn apps and I need to route my AppleTV through a VPN to unlock my Iptv service whenever my ISP decides to be a jerk
Hi Jota,
Something like our Raspberry Pi VPN Access Point will be helpful for you. This tutorial will show you how to set it up so you can connect your device to the Pi’s own access point which will direct all web traffic through the VPN.
Cheers,
Emmet
Awesome writeup and that script is super simple…I even installed it on an older machine running Ubuntu server and it works GREAT!
So cool being able to be out and about and use the VPN for security but also be able to connect to my home PLEX server securely.
Any way to connect to the VPN from a mobile device like an iPad?
Hi Joel,
You should be able to connect to it by using an OpenVPN capable client.
From memory there is an app called “OpenVPN Connect”.
Cheers,
Emmet
This is a very useful tutorial and has helped me set up my Pi VPN successfully.
However, the author of the script has changed the type of encryption they are using so your April 2019 update needs another tweak. But that is not my concern. In the past the key generation step used to take quite a while (one hourish as I recall) to run. Now it is instantaneous.
Whilst the VPN seems to be working, does anyone know how we can check it is securely encrypted?
Hi every one,
I have set-up a VPN Servers using this program, PiVPN and they work every time.
I nevertheless have an issue with RasPi 3, was working fine for 2 days and did not show up in the Router as it was alongside the other devices, I rebooted the Router, the RasPi 3, nothing, so I changed it to RasPi 2 and it is working like a charm.
Has anybody come across this problem at all?
Curious, would this run ok on rPI zero W? or do we prefer it being hardwired?
I have a Pi zero and it works fine. Whilst a wired network is considered more secure, provided you set up your Pi to be accessible from the internet correctly, it should work for you too.
Hey, I’ve done all the configuration by using this guide but I can’t get connected to the VPN, always reconnecting. Why? Anyone can help me?
fantastic! thanks
Hello, just before I get started on this tutorial I was just wondering if this process will wipe my raspberry pi? It’s just that I currently have other software running on it and wanted this to run along side it?
It won’t wipe your Pi but it may cause issues with other software running on it. If you wanted to be safe you can always backup your SD card first so you’re always able to revert back to a safe point.
Perfect thanks very much!
Hi guys, Im witnessing such kind of issue when I try to connect:
UDP: Connection reset by peer (WSAECONNRESET) (code=10054)any idea how to resolve it?
Switch to “proto TCP” and see if it is working. This error usualy indicate a port accesibility problem and/or poor connection between client and server.
In step 18, you have used the Google DNS server. If they are indeed known to record data, can you recommend an alternative??
Hi there,
If I am not mistaken these OpenDNS IP addresses may be the one you are looking for:
Found this site: https://support.opendns.com/hc/en-us/articles/228007087-Ubuntu,
Step6
I have not tried them myself yet but they seem to work, the OpneDNS is listed on the set-up step, 18, I think.
Good luck, let us know if it does work.
Cheers
Siamak
You could use the Cloudflare DNS which doesn’t record data. It is also much faster than any other DNS.
Hope this helps
Run your own private pihole in your network…point it at that, now it will go thru a spam/advert filter in your network and also cache DNS queries…
this tutorial worked for me thank you so much for this.
Once I am connected to the VPN server which is my pi. How do ftp to the network where my pi is.
Sorry if this question sounds like a dumb question. But I am not that good at networking.
Thanks
Use your home IP to your FTP, the OpenVPN will redirect the traffic and your remote appliance will look just like another device in your home network
Logfile below in case this helps…
2017-06-20 23:01:52 Control Channel Authentication: tls-auth using INLINE static key file
2017-06-20 23:01:52 Outgoing Control Channel Authentication: Using 256 bit message hash ‘SHA256’ for HMAC authentication
2017-06-20 23:01:52 Incoming Control Channel Authentication: Using 256 bit message hash ‘SHA256’ for HMAC authentication
2017-06-20 23:01:52 Socket Buffers: R=[196724->196724] S=[9216->9216]
2017-06-20 23:01:52 UDPv4 link local: [undef]
2017-06-20 23:01:52 UDPv4 link remote: [AF_INET]xx.xx.xx.xx:1194
2017-06-20 23:01:52 MANAGEMENT: >STATE:1497996112,WAIT,,,
I get the same error, and the solution was open the port 1194 UDP in my router (the router connected to my Rasperry pi), and that’s it!, problem resolved, just was that.