How to Change Your Network Profile to Public or Private in Windows 10

Windows 10 makes it easy to set your network profiles for wired or wireless devices to public or private. Find out how you can do it with your network.
In Windows 10, there are two sets of default security and sharing settings when you connect to a wired or wireless network: public and private. The names of these two settings are fairly straightforward. Private networks are in your home or office, while public networks are everywhere—coffee shops, airports, libraries, etc.
That much is obvious. But how does Windows 10 treat public networks and private networks differently? And how do you switch from one to the other? That’s precisely what we’ll be covering in this article.
Set Your Network Profile in Windows 10 to Private or Public
When you first connect to a network, Windows will ask you what kind of network and what settings you want to use. If you don’t remember doing this or change your mind about creating a network, you can switch it.
Generally speaking, when you set a network profile to “public,” the settings are more restrictive. Your PC won’t be visible to other devices on the same network. Other devices won’t be able to access your files or printers on the network.
On a “private” network, Windows 10 assumes that you are on a trusted network that only you and your family members have access to. Your device will be discoverable on the network (others can see it). If you are using Homegroups, you’ll be able to share printers and files with other computers on the network.
Public and private networks also have different firewall settings. By default, both public and private networks have pretty restrictive firewall settings. But you can customize your firewall settings to be different depending on what type of connection you’re on.
How to Change a Wireless Network to Private or Public
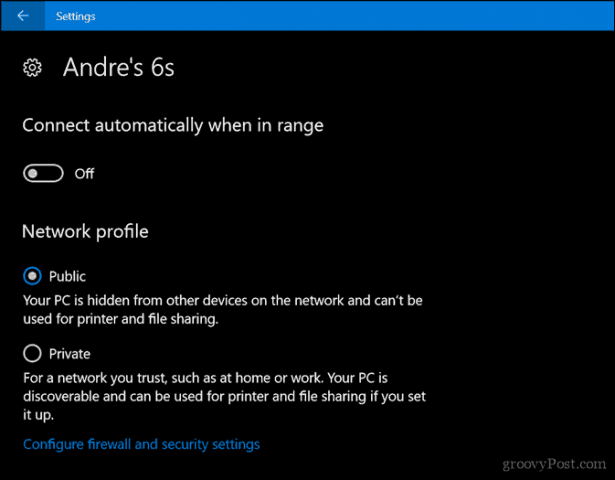
To change from a public network to a private network for vice versa, start by connecting to your network. You can do this by opening the available Network icon in the Notification area. Select the network, then connect to it. After connecting, select it, then click Properties.
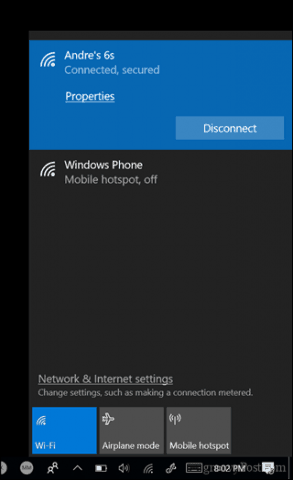
Here you can change your Network profile to Public or Private. Choose the one that best suits your environment.
How to Change a Wired Network to Public or Private
If you want to change the network profile for a wired network, open Start > Settings > Network & Internet > Ethernet, then click your network adapter.

Then choose the profile you want.

Customize Public and Private Network Settings
You can change the settings for your public or private networks. For example, if you wanted to make your computer discoverable on public networks (not recommended) or disable file or printer sharing on a private network, you could.
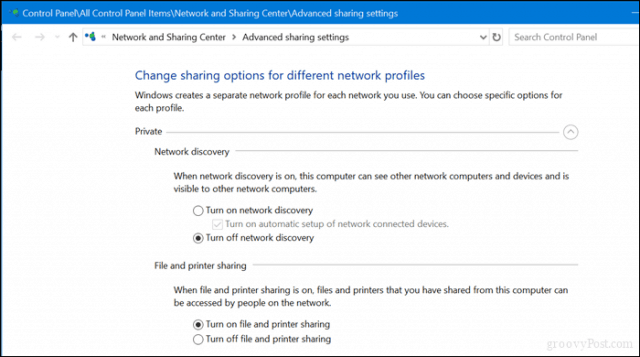
Open Start > Settings > Network & Internet, under Change your network settings, click Sharing options.

Expand Private or public, then choose the radio box for the desired options such as turning off network discovery, file and printer sharing, or accessing homegroup connections.
There you have it, easy ways to protect or give access to your networks. If you want to learn more about managing networks in Windows 10, check out our other articles, How to Create and Join a HomeGroup in Windows 10 and Connect Windows 10 to Wired, Wireless, and P2P Networks. Users working with a mix of Macs and Windows can find help in our guide How to Network Windows 10 and OS X and Share Files.
John Yungton
November 19, 2017 at 2:41 pm
Too bad Win 10 changes ‘control options’ so often, I don’t have any network public / private options, shown above, to pick from. Win 10 Pro Ver. 1709 Build 16299.64
minnesotauser
December 5, 2017 at 8:33 am
I have the same situation as John Yungton. no public/private opttions. Version 1703, build 15063.726.
LED
August 13, 2022 at 2:48 pm
I believe it is because Win 10 removed the Homegroup settings and with some adjustments via Work Group and/or WiFi then changes can be made…
Douglas Hardy
April 2, 2018 at 1:54 pm
I can find the option but when I change it from turn off discovery to turn on discovery it lets me save it but as soon as i go back to check it i find that is has gone back to turn off discover all by itself.
Any suggestions???????
Regina
July 17, 2019 at 11:56 pm
Thank you for your explanation. I’m so frustrated with trying to get my wifi private as I see the same name with a ‘2’ behind it which is public and I want to delete it.
Martin Halls
October 22, 2019 at 1:29 pm
does nt work for me very little of the above appears as shown above and it seems impossible to select private or public anywhere.
advan
February 12, 2021 at 9:01 am
Open Settings.
Click on the Network and Internet icon.
As you are using a wired connection, click on Ethernet.
Click on the connection name on the right. In my case, it is named just “Network”.
Turn on the desired option
Albert
August 5, 2023 at 8:20 pm
Thank you!
Distressed
February 25, 2021 at 9:46 pm
These instructions are pointless because Microsoft keeps changing the UI every release so nothing that worked before works a year later… I HATE that. And they do it everywhere. Hide options, move them around, make things more and more difficult for the average user on purpose.
sagar
April 8, 2021 at 12:56 am
not working
Freonpsandoz
October 21, 2021 at 8:47 pm
There’s no “Properties” button. #FW10