


Recipes: Pork belly ‘sous vide’ at home
Eating great food around the world is more than (a) filling the belly with delights while (b) emptying the bank balance (but so worth it!). It’s a chance for Greedy Girl and gluttonous husband to dissect the flavours, textures and techniques emanating from kitchens great and small and ponder the age-old conundrum – ‘how did they do that?’.
In the kitchen, Greedy Girl defers to her very talented better half. She really doesn’t have much choice. The kitchen is gluttonous husband’s domain. Get under his feet and one risks getting trampled as he moves, with blistering speed and single-minded purpose, between gas hobs, oven, fridge, microwave and – his latest toy – the sous vide machine.
Sous vide, French for ‘under vacuum’ is the process of cooking vacuum-sealed produce in a temperature-controlled water bath. It’s widely used in top professional kitchens for producing soft, tender, delicious results for all manner of meats and fish in particular, but also vegetables if you’re that way inclined. Generally, produce is cooked for long periods at a set temperature, retaining the food’s natural juiciness and nutrients. Commercial kitchens have full-on equipment designed to maintain the water temperature but, if you’re diligent, you can replicate a water bath with a large water pot and thermometer. Can be tricky to keep the temperature constant though.
Greedy Girl found a sous vide at home starter kit, which includes a separate small vacuum sealing machine. The sous vide machine is the size of an average bread maker (remember those?) and a similar shape. It’s designed to sit on a counter top and Greedy Girl recommends a spot not too far from the sink – the machine can be decidedly heavy once it’s filled with water and unless you want to bail by hand after you’ve finished cooking, it’s perhaps simpler just to unplug and tilt to empty.
Greedy Girl provided this to gluttonous husband for Christmas with a book of sous vide cooking by the American chef/superstar Thomas Keller of French Laundry and Per Se fame.
Greedy Girl and gluttonous husband were lucky enough to get a booking at Per Se in New York City on their 2011 trip. We were required to be present at the Time Warner Centre, overlooking Columbus Circle at 5.30pm to begin the nine-course set Chef’s tasting menu. It felt a bit like the early-bird special but, in luxurious yet understated surroundings (i.e., not noisy or crowded, with exceedingly comfy chairs and a lovely aspect at the south-west corner of Central Park) we were treated to one of the gastronomic evenings of our life. Greedy Girl wishes she had started her blog a year earlier to bring you a blow-by-blow of this sumptuous evening which was highlighted by remarkable dishes and exceptional service. Five hours later she waddled out, given the Maitre D’s card and a little goodie bag to remember them by.
But, another time for more on Per Se, perhaps. This blog will concentrate on one of Thomas Keller’s favoured techniques, sous vide, specifically cooking a pork belly.
This artery-hardening delight is everywhere on menus these days. Some food snobs are incredibly dismissive of how ‘uncommon’ it has become but there’s no doubt that, for lovers of pork, it’s a soft, juicy, succulent cut – and prepared well, exceedingly yummy.
Cooking pork belly sous vide is not for the squeamish – especially when you see what sort of fat comes out during the process. When meat has this amount of fat, the longer you cook it, the better. With his chef’s hat on, gluttonous husband shares his step-by-step to achieving a delicious result.
The cooking time in sous vide (and we’re using meat as our example here) is generally dictated by the thickness of the cut. A 20cm square slab of pork belly which was, on average, 3-4cm thick was vacuum sealed and cooked in the sous vide machine set to 82 degrees celsius for 12 hours. Yep. 12. Not everything needs to be cooked for such a long (or longer) time – gluttonous husband has done carrots sous vide that took 50 minutes at 85 degrees.
To flavour the pork, gluttonous husband created a marinade: equal parts of five spice powder and brown sugar, dampened with soy sauce, rubbed into the meat. Using a little soy sauce means you don’t need to add salt – but you don’t want liquid, just a nice moist rub. Too much liquid makes it impossible to vacuum seal the bag.
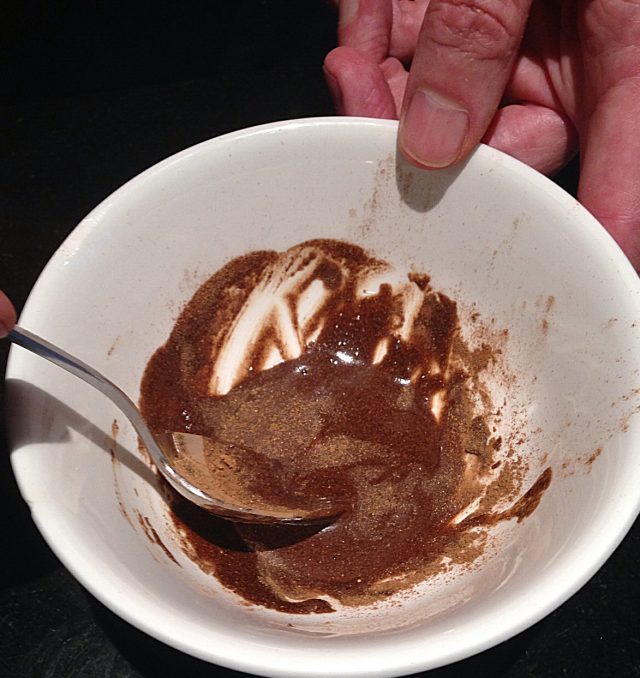
Prepare the marinade
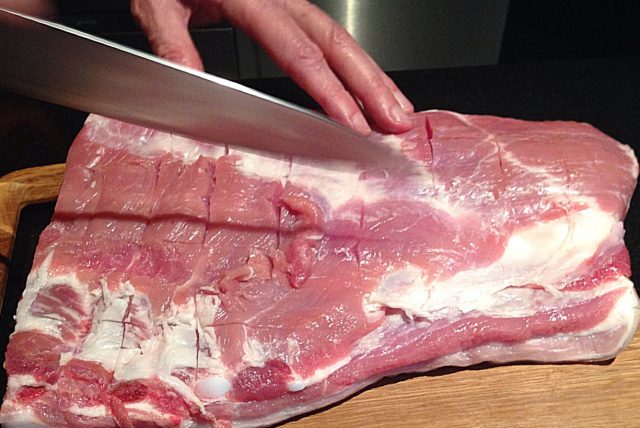
Trim any visible sinew and score the skin
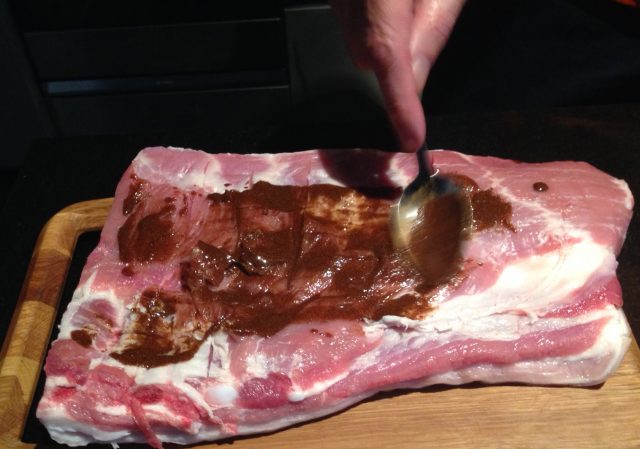
Spread the marinade evenly
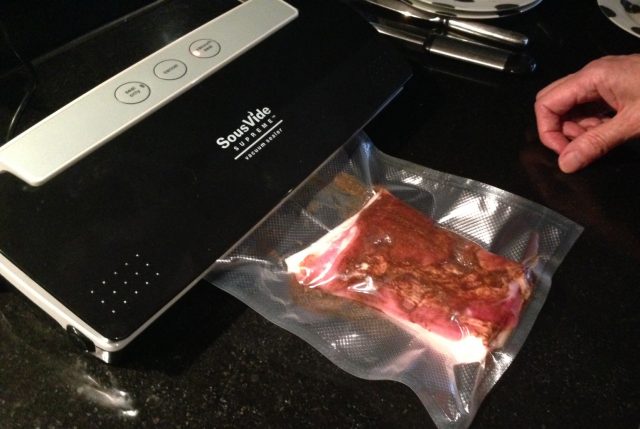
Vacuum seal the bag
This is not a labour-intensive way of cooking. It’s almost too easy. If you are cooking a piece of meat that has a bone (a lamb chop, for example) just make sure the bone doesn’t pierce the bag when you vacuum seal it. No such dramas for the pork belly which, once sealed, sits in the machine, quietly cooking away, breaking down the fat into oozy lusciousness. If you have a large piece of meat, just cut it into portions that will fit in the bag (and your machine).
When it’s ready to come out, you can slit open the bag immediately to take the next step, or just throw it into the freezer – and leave it there until you want a pork belly for an evening’s treat/comfort food fix. You need time to let it thaw and for the skin to dry out, so best to take the meat out of the deep-freeze the night before.
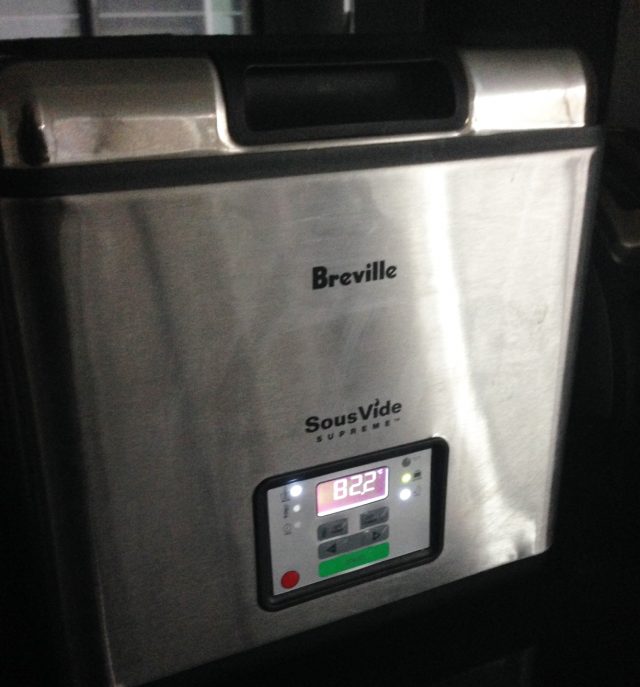
Cook at 82 degrees for 12 hours!
When it comes to the next stage, here are the tips and tricks. Either fresh from the sous vide machine or after the pork has thawed, open the plastic bag, put the pork belly on a flat plate or ovenproof dish and weigh down the top with something heavy. Gluttonous husband uses his mortar on top of another plate. This squeezes a lot of the fat out of the pork into the bottom of the dish – this has the effect of keeping the meat still very moist and tender when you put it into the oven to crisp up the skin. Gluttonous husband weighs the pork down overnight.
The next day, take off whatever you’ve used to weigh it down and leave in the fridge uncovered to dry the skin out. Take it out of the fridge an hour before you plan to cook it so the pork reaches room temperature, pre-heat the oven to 210 degrees celsius and whack the dish in. Check every 10 minutes until the skin has become crisp – although it will probably take at least half an hour.
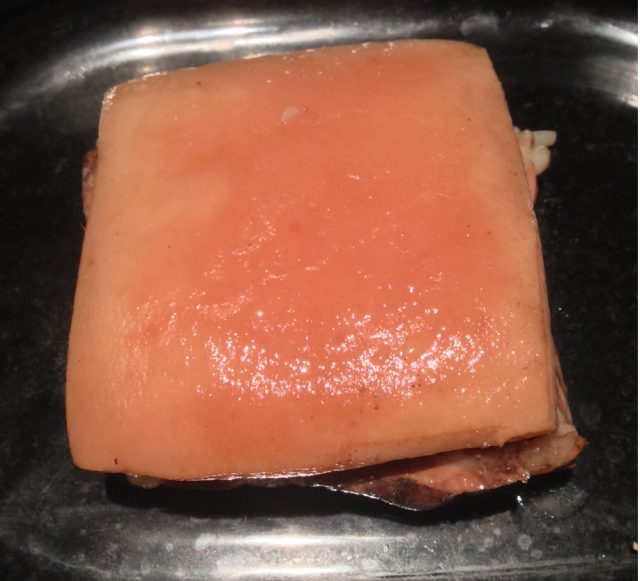
Ready for the oven
Patience is the key here. You don’t want the oven so hot that the skin burns. When you tap the skin, it’s hard. Note: the skin won’t blister like traditional ‘crackling’. Take it out of the oven when it reaches the desired texture (and has warmed through the belly pork) and cut into bite-sized morsels.
If you want to speed up the process a tad, you don’t need to weigh the pork belly down overnight – it will just be a little fattier to eat. You can also dry out the skin faster if you put it into a 50-70 degree celsius fan-forced oven and leave the door open. Keep a watching brief for when the skin feels dry – once you’re satisfied with that, ramp up the oven temperature and crisp the skin – as per the instructions above.
The result is a mouth-wateringly soft pork with a lovely crunchy top.
Depending on where you live in the world, a home sous vide set-up can be more or less expensive. Here in Australia it’s the former, rather than the latter. Whether you use the machine or not to try sous vide, you need to make sure your food is cooked. In particular, cooking meat at low temperatures can have some implications with regard to bacteria and other nasties. The challenge is finding a temperature and length of cooking time to ensure any of these issues are literally ‘cooked out’. When you buy the ‘at home’ set up, a handy book provided with it gives you sous vide cooking 101 and there are loads of resources also available online.
Comments