
The Raspberry Pi is a credit card-sized computer that can crack Wi-Fi, clone key cards, break into laptops, and even clone an existing Wi-Fi network to trick users into connecting to the Pi instead. It can jam Wi-Fi for blocks, track cell phones, listen in on police scanners, broadcast an FM radio signal, and apparently even fly a goddamn missile into a helicopter.
The key to this power is a massive community of developers and builders who contribute thousands of builds for the Kali Linux and Raspberry Pi platforms. For less than a tank of gas, a Raspberry Pi 3 buys you a low-cost, flexible cyberweapon.

Of course, it's important to compartmentalize your hacking and avoid using systems that uniquely identify you, like customized hardware. Not everyone has access to a supercomputer or gaming tower, but fortunately one is not needed to have a solid Kali Linux platform.
With over 10 million units sold, the Raspberry Pi can be purchased in cash by anyone with $35 to spare. This makes it more difficult to determine who is behind an attack launched from a Raspberry Pi, as it could just as likely be a state-sponsored attack flying under the radar or a hyperactive teenager in high school coding class.
Thinking Like an Attacker
The Raspberry Pi has several unique characteristics that make it a powerful and easily accessible tool in a penetration tester's kit. In particular, the Pi is cheap and the components cost as little as a Lego set. Also, the Raspberry Pi is discreet; It's small, thin, and easy to hide. And thanks to running Kali Linux OS natively, it is flexible and able to run a broad range of hacking tools from badge cloners to Wi-Fi cracking scripts. By swapping the SD card and adding or removing components like a packet-injection capable wireless adapter, the Raspberry Pi can be customized to suit any situation.

The Raspberry Pi on Offense
First, it's important to manage your expectations and remain reasonable when selecting a Raspberry Pi as a hacking platform. The Raspberry Pi is not a super computer and doesn't have a tremendous amount of processing power. It's not well-suited to processor intensive tasks like brute-force WPA password cracking, or acting as a network attack as the connection is too slow to fool users. That being said, the Raspberry Pi is perfectly suited to many attack environments. We simply offload these tasks to bigger computers and use the Pi as a data collector.
In my experience, the Raspberry Pi works exceptionally well as a Wi-Fi attack platform. Due to its small size and large library of Kali Linux-based attack tools, it's ideal for reconnaissance and attacking Wi-Fi networks. Our offensive Kali Linux build will be geared towards anonymous field auditing of wired and wireless networks.
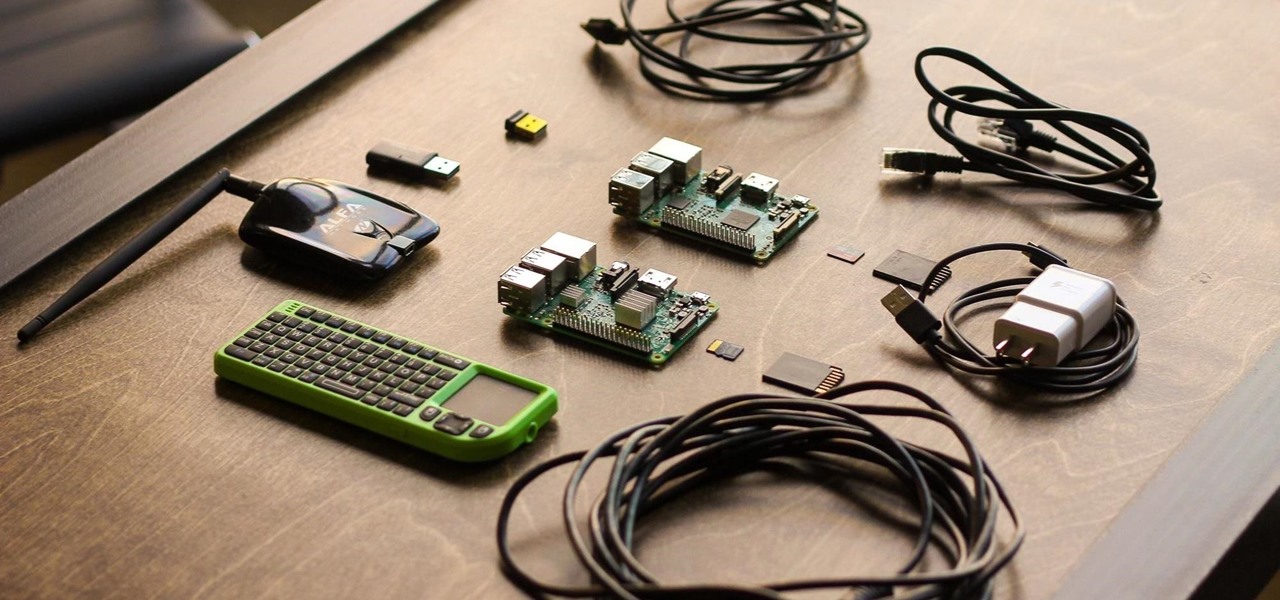
The Basic Components of Our Attack System
Here are the basic components needed to build our Pi attack system, and why we need them. If you're just starting out, this excellent Raspberry Pi Kit from CanaKit includes most of what you need to get your Pi set up.
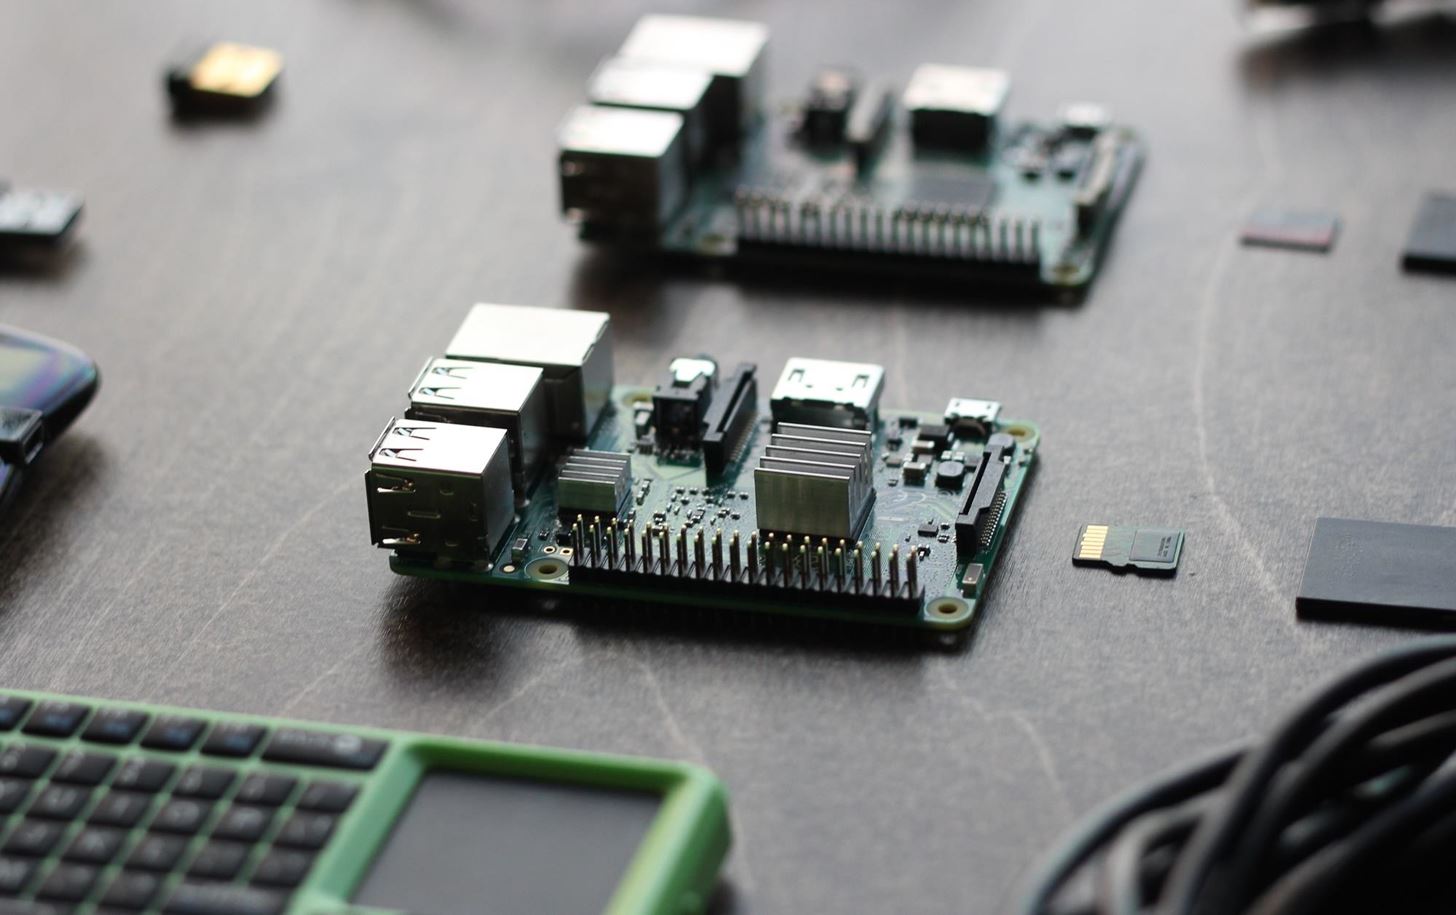
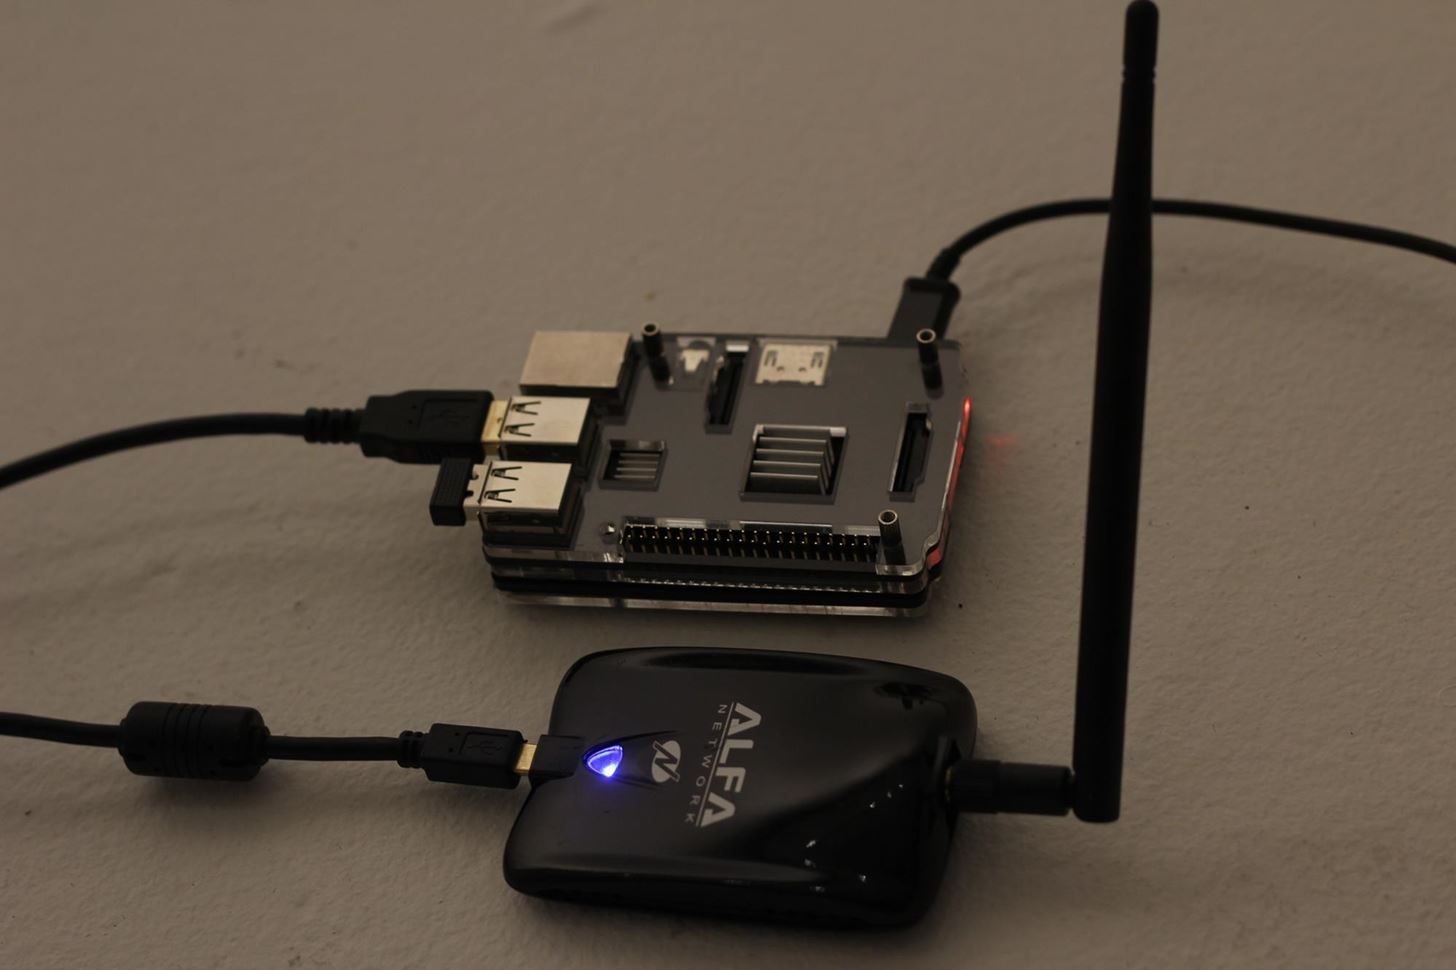
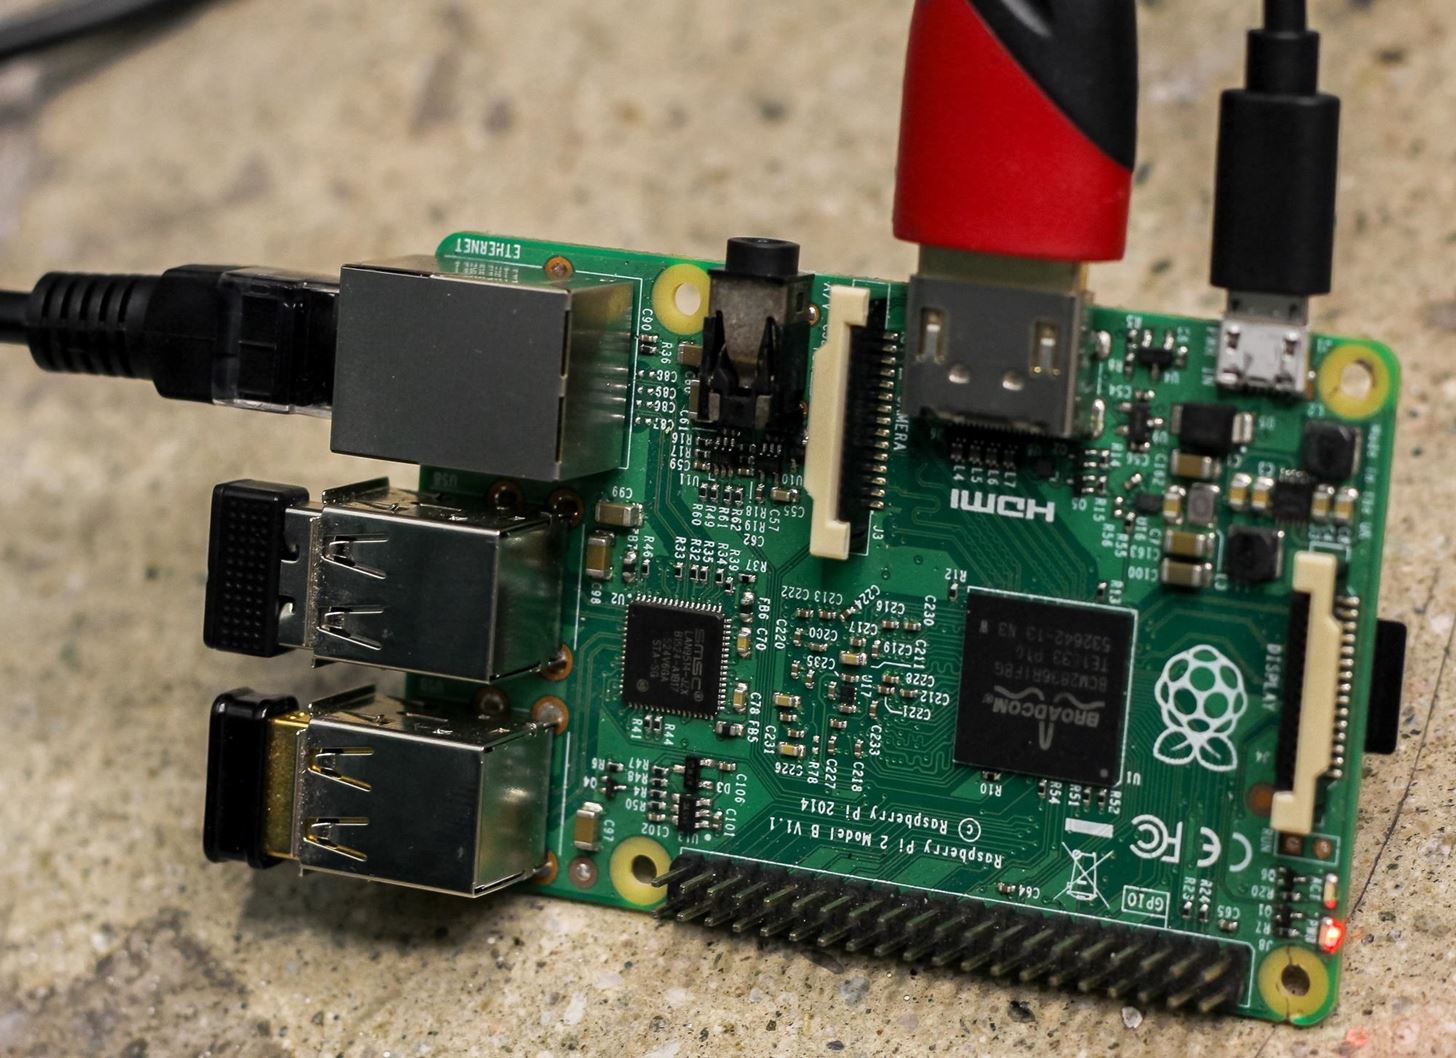
- Raspberry Pi: The Raspberry Pi 3 is the platform of these builds, coordinating and controlling all other components. Its low power consumption and flexible capabilities allow it to serve as a platform for running Linux-based operating systems besides Kali.
- Command and control (C2) wireless card: The purpose of the C2 wireless card is to automatically connect the Pi to the command AP (access point) such as your phone hotspot or home network. This allows remote control of the Pi discreetly or from a great distance via SSH (Secure Shell) or VNC (Virtual Network Computing). Fortunately for us, the Raspberry Pi 3 has a Wi-Fi card internally, but a wireless network adapter can also be added to a Raspberry Pi 2.
- Wireless attack card:: Our attack wireless card will be a Kali Linux-compatible Wi-Fi adapter capable of packet injection. This will be our attack surface and can be a long-range, short-range, or directional antenna depending on attack requirements. You can find a great guide to choosing one here.
- OS build cards: The micro SD card hosts the OS and brain of the computer and can be precisely configured for any desired environment. By creating customized cards, it is possible to rapidly change the configuration and function of a Raspberry Pi by simply swapping the card and components.
- Computer: You will also need a computer to download the firmware to load onto the micro SD card.
- Power supply: The Raspberry Pi uses a standard Micro-USB power supply, and nearly any Android phone charger or battery pack will work to power a Pi. This allows for a number of different battery configurations to suit long-endurance reconnaissance or continuously powered operations.
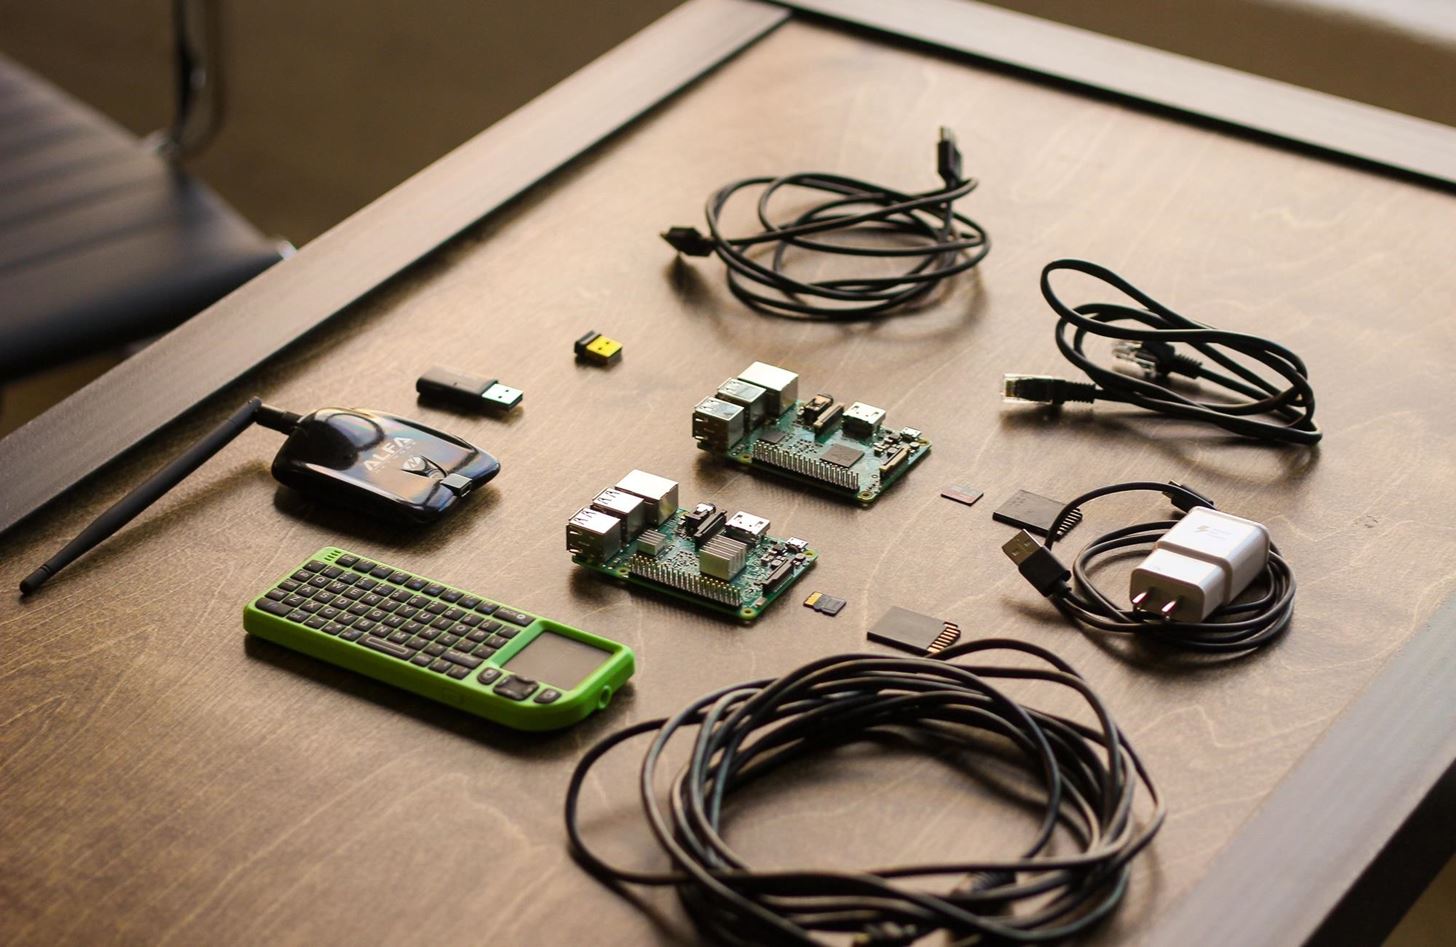
- Ethernet cable (optional): An Ethernet cable allows you to bypass wireless authentication by directly interfacing with local networks to which you have physical access. Specialized attacks like PoisonTap can also take advantage of ethernet interfaces to infiltrate computers.
- Bluetooth keyboard (optional): A Bluetooth keyboard is helpful for interfacing when you have an HDMI connection.
- Case (optional): Every Pi needs a case to protect it.
Build Considerations
In designing this tutorial, I considered two primary modes in which you would be operating the Raspberry Pi. In our open configuration, the Raspberry Pi is connected to a display via HDMI cord with inputs running through a wireless mouse and keyboard. In our tactical configuration, you will use a laptop or smartphone to access the Raspberry Pi remotely via SSH. By connecting the Pi to our phone's hotspot or a nearby friendly AP, we can access the Raspberry Pi while still being able to use cellular data in the field.
How to Set Everything Up
In this guide, I'll show the steps needed to set up a Raspberry Pi 3 as a basic hacking platform with Kali Linux. I'll go over how to select a build to install, writing the disc image to a micro SD card, and the steps to run after first setting up your Pi. We'll update Kali Linux to the latest version to ensure everything works correctly, change the default SSH keys, and take care of some housekeeping like changing the admin password.

As a note, there are many ways to configure Kali on a Raspberry Pi 3. Some include touchscreens, some are completely headless (accessed via network connections without a keyboard or display), and others use the internal Wi-Fi card to create a hotspot for remote control of the Pi. In selecting this build, I discounted any designs that included a power-hungry and fragile touchscreen or additional hardware, and settled a version optimized for our two different C2 scenarios.
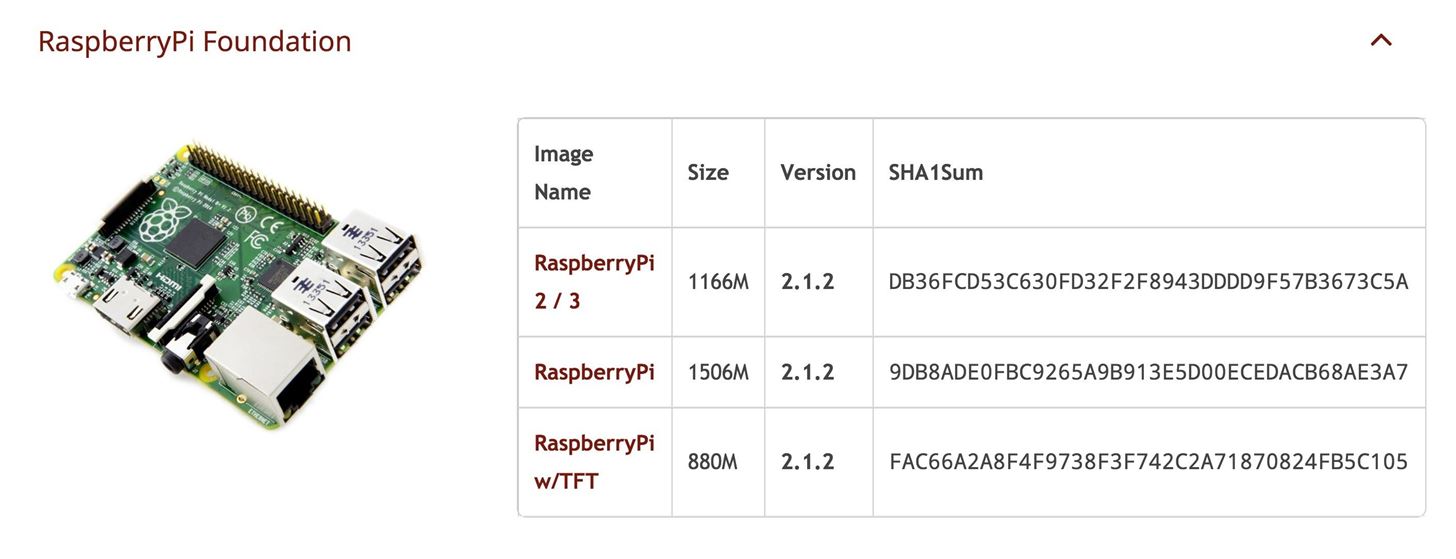
Step 1: Download Kali Linux Image for the Raspberry Pi
Head to Offensive Security and download the latest Kali Linux image for the Raspberry Pi. As of this writing, it is "RaspberryPi 2 / 3" on version 2.1.2.
Step 2: Flash the Image to the Micro SD Card
You can use a tool like ApplePiBaker for Mac or Etcher to load your Kali image onto your SD card, but sometimes these can result in errors. To prevent that, we'll cover how to do this via Terminal on a Mac. If you use Windows, you can use Win32 Disk Imager to put your image on the card.
On a Mac, before plugging in your SD card, run the following in Terminal:
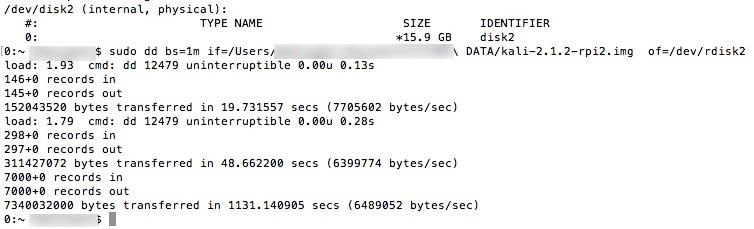
df -hThis will display a list of all the disks attached to your system. Attach your SD card and run the command again, and note the filesystem name of your SD card (it's the one that wasn't there before). It should look like "/dev/disk2s1" and you should be very careful not to mix this up in the next steps, since doing so could overwrite your hard drive.

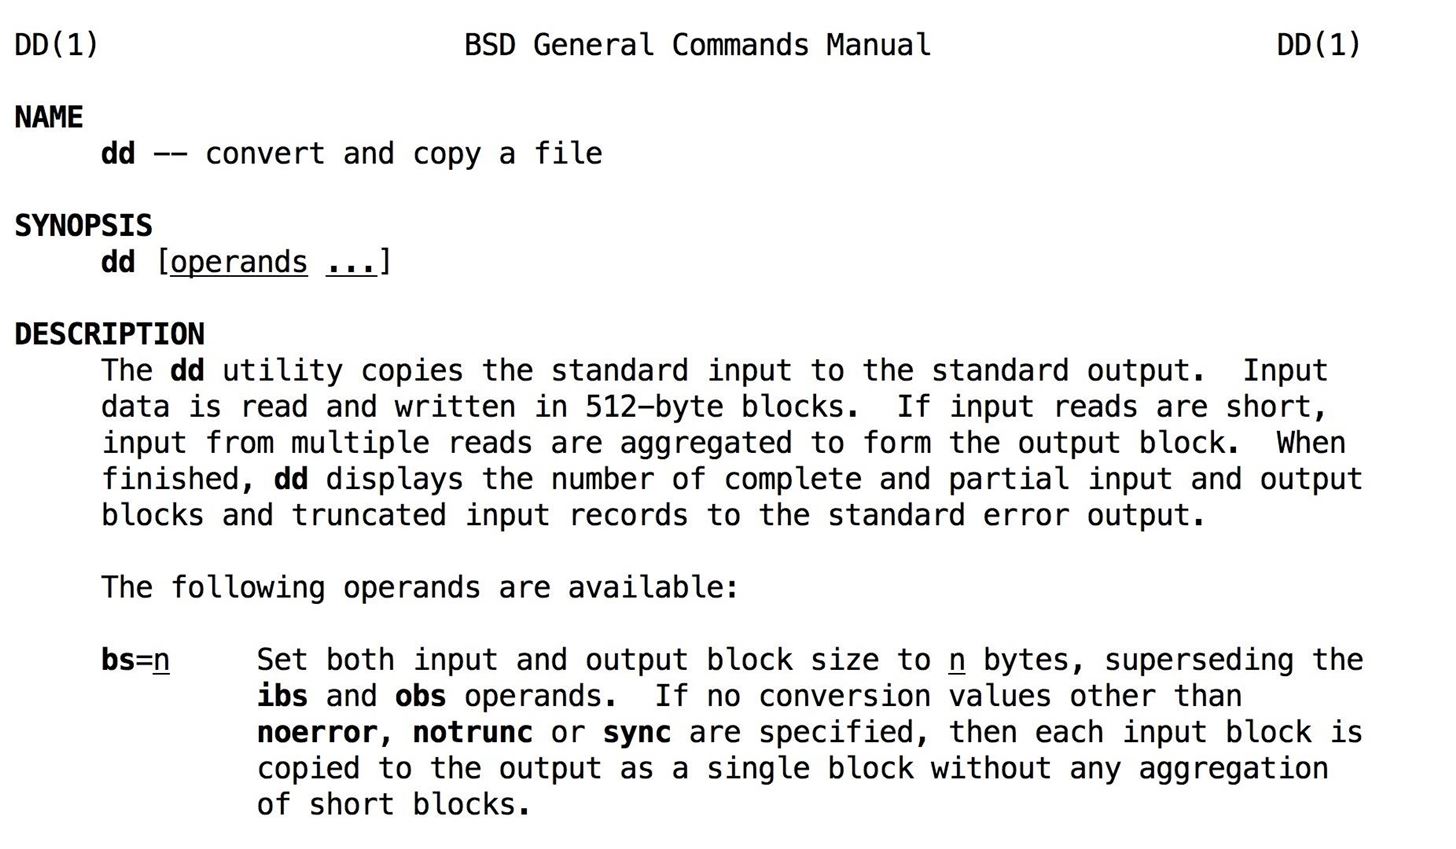
Now, we'll use the dd command to load the Kali image onto the card.
First, let's unmount the partition so you can write to it with the following command, with "x" being the correct disk number:
sudo diskutil unmount /dev/diskXNow we're ready to load Kali. Type, but don't run the command, sudo dd bs=1m if= and enter the location of the Kali Linux image we want to load onto the card. You can drag and drop the disk image into the window to show the file path. After that, type a space, then of=/dev/rdisk and the number of the disk from before.
If there is an "s" after the initial disk number (like rdisk2s1), do not include the "s" or following number. So, "rdisk2s1" should look like "rdisk2." Here's what it should look like altogether:
sudo dd bs=1m if=LocationOfKaliImage of=/dev/rdiskXPress enter to begin the process, and note that dd does not provide any on-screen information unless there is an error or it finishes. To view the progress during the transfer, you can type Ctrl T. Wait for the process to complete. You'll know the process is complete when you see a readout of bytes transferred over the time the process ran.
It will look like the screenshot below (if you press Ctrl T a few times during the transfer) when complete.
Step 3: Boot into Kali Linux
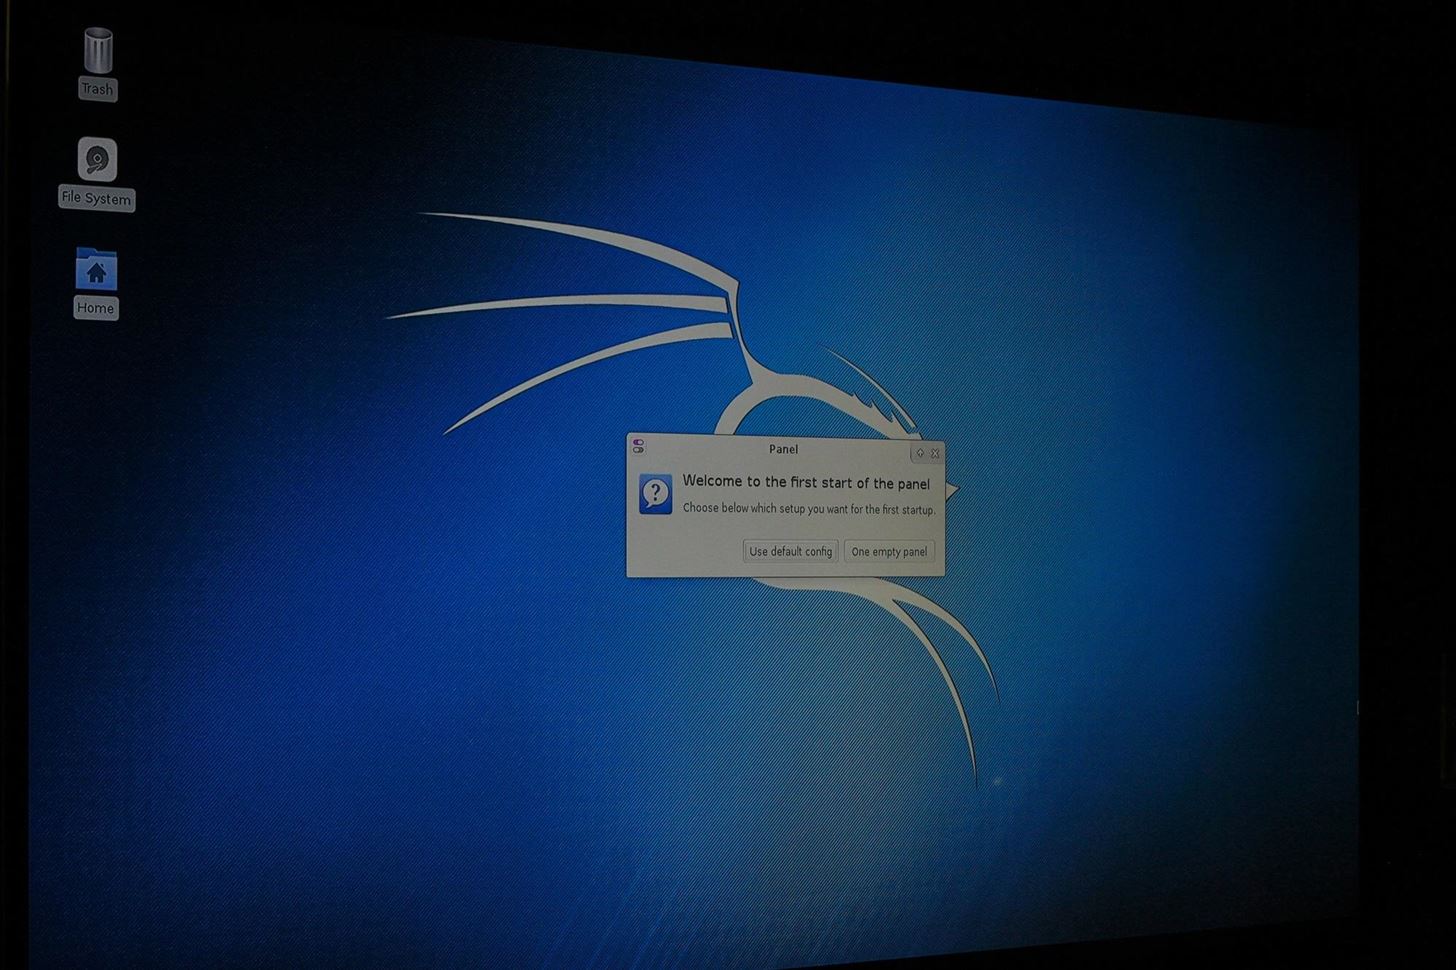
When finished, your SD card is ready to go! Insert the SD card into your Pi, connect it to HDMI, and attach your Bluetooth keyboard. Plug in the power source to boot into Kali Linux for the first time. To get to the desktop, your default login is "root" with "toor" being the password.
The login process is a problem for autonomous control, and we will need to disable it later. This will let us plug our Pi in and immediately connect to it remotely without a screen.
Step 4: Update Kali Linux
Kali Linux is a special flavor of Debian Linux meant for penetration testing, and a favorite here on Null Byte. It's compatible with some of the best and most advanced tools available for wireless hacking, and flexible enough to support a large number of hacking builds. It's maintained by Offensive Security, and you'll need to update it to the latest version to make sure all the tools work properly.
Before running, now is a good time to expand your installation to the size of the partition. To do so, run the following:
resize2fs /dev/mmcblk0p2At the top right of the desktop, you'll see an option to connect to a nearby wireless network. Connect to your phone's hotspot or a friendly AP to fetch the update. Run the update by opening a terminal window and typing the following:
apt-get update
apt-get upgrade
apt-get dist-upgrade
Your Kali install is now up to date. Update the root password to something more secure than "toor" by typing:
passwd rootThen enter a new password for your Kali Linux system.
Step 5: Install OpenSSH Server
To communicate with our Raspberry Pi from a computer or phone, we'll need to be able to log in. To do so, we can use SSH to connect via any Wi-Fi connection we share with the Pi. SSH, or the Secure Shell, is a network protocol that allows us to run commands remotely on a device. This means we don't need to plug in a screen to interact with our Pi.
In a terminal, run the following to install openSSH server and update the runlevels to allow SSH to start on boot:
apt-get install openssh-server
update-rc.d -f ssh remove
update-rc.d -f ssh defaults
The default keys represent a huge vulnerability since anyone can guess them. Let's change them immediately by running the following commands:
cd /etc/ssh/
mkdir insecure_old
mv ssh_host* insecure_old
dpkg-reconfigure openssh-server
This backs up the old SSH keys in another folder and generates new keys. Problem solved! Now let's make sure we can log in via root by typing:
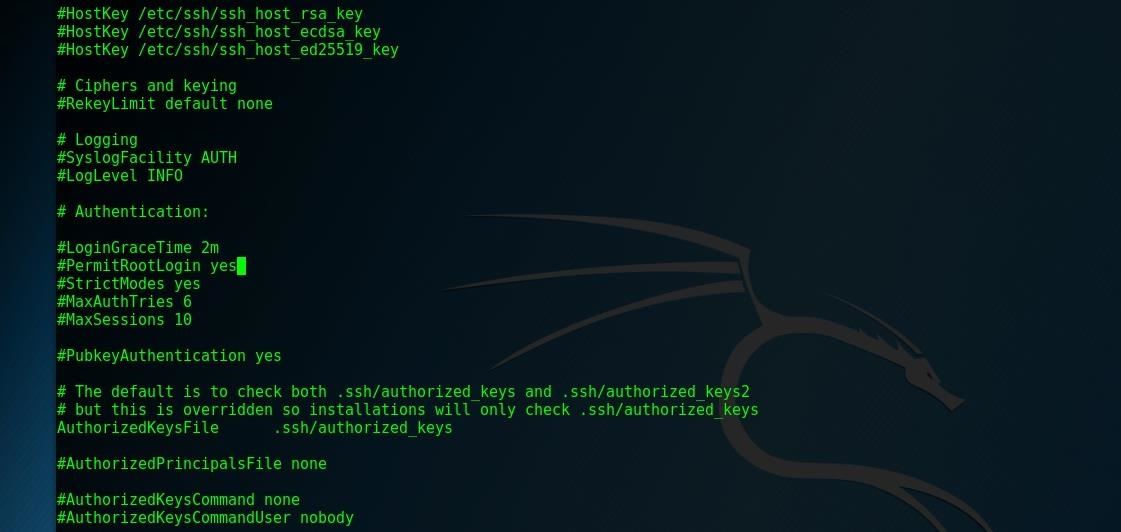
nano /etc/ssh/sshd_configThis will open your SSH configuration folder. Change this line:
PermitRootLogin without-passwordTo this line instead:
PermitRootLogin yesAnd type Ctrl O to save the changes. If it already is correct, you don't need to change anything.
Great! Let's restart the SSH service by typing:
sudo service ssh restart
update-rc.d -f ssh enable 2 3 4 5
Finally, to test that we've got SSH working, use the following to see if SSH is currently running.
sudo service ssh status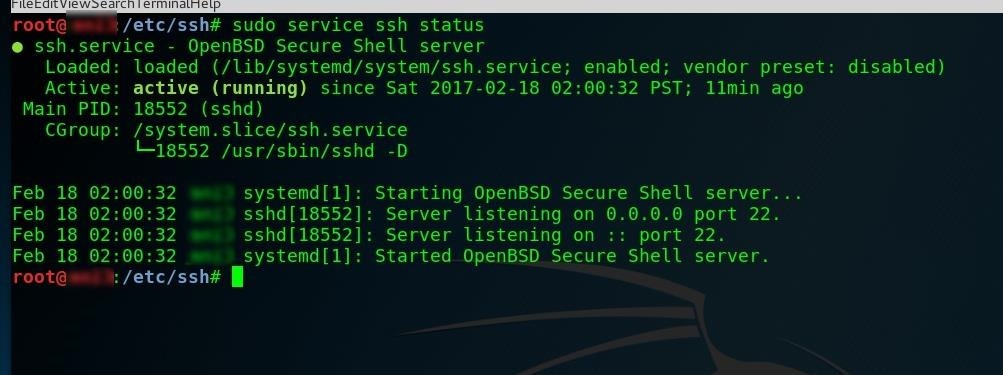
If it's not, run this to get it going:
sudo service ssh startIf you find SSH doesn't work, you can use raspi-config as a workaround. It's meant for Jessie, but it'll work on Kali, too. To use it, first clone from GitHub, type sudo mount /dev/mmcblk0p1 /boot to mount the boot partition, cd to the directory, and run sudo bash raspi-config.
Step 6: Create a Custom MOTD
Of course, the speed and power of your hacking computer is directly related to how cool your message of the day (MOTD) banner is. You will be greeted with this upon successful login, and traditionally is used with some ASCII art to spice things up.
Create your own by typing:
Nano /etc/motdDelete the contents and paste whatever you want to show up each time you log in.
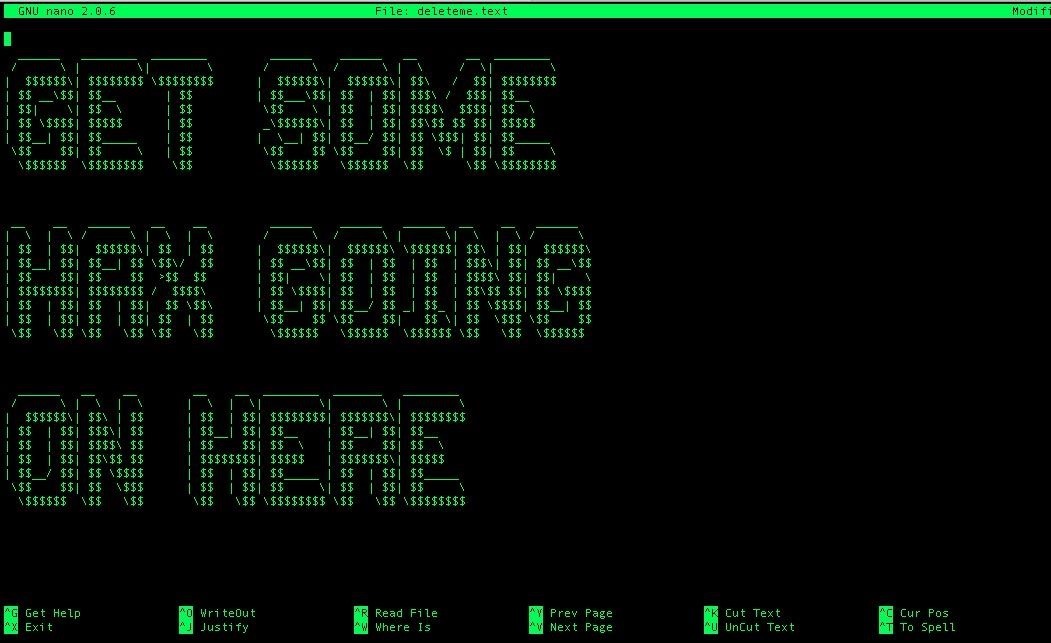
Save and exit nano by hitting Ctrl O, then Ctrl X.
Step 7: Test Login via SSH
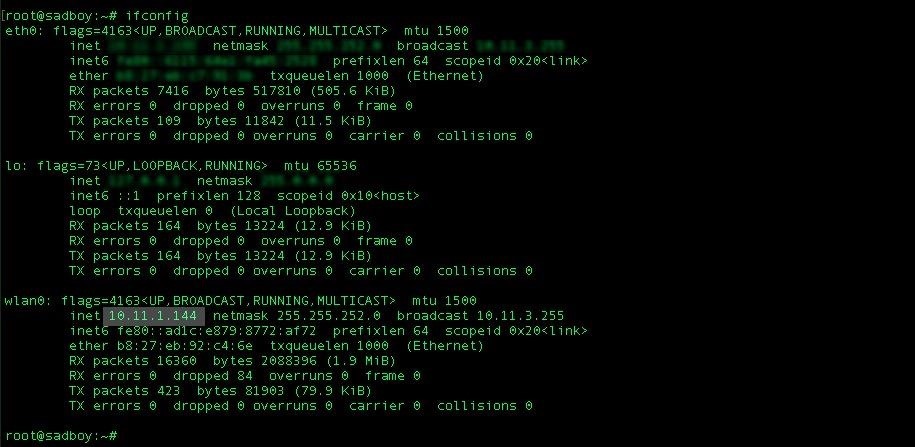
Let's try logging in from your home computer or laptop. Connect the Pi to the same wireless network your home or work computer is on. Run the command ifconfig on your Pi in terminal to learn your IP address.
ifconfigIn the comments, some people mentioned getting an error here. If so, try running
sudo apt-get install net-tools to determine if you don't have net-tools installed. Run ifconfig again and see if it works. Thanks to N1GHTANG31 for pointing this out!
On your personal computer, type:
ssh root@(your IP address)You should see your MOTD screen!
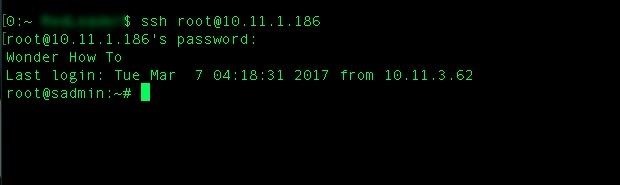
If not, you can run an arp-scan on a Mac to see a list of all available devices on the network if you need to find your Pi's IP address from personal computer.
Step 8: Configure Autologin for Headless Operation
Sometimes, we will want to be able to log into an account other than root. Let's create a new user named WHT (or whatever you like) with root permission by running:
useradd -m WHT -G sudo -s /bin/bashChange WHT's (or whatever you named it) password to something more secure than "toor":
passwd WHTGreat! Now let's disable that login from before so we can boot directly into Kali, and our wireless cards will start up and connect to allow us remote control. To do so, type:
nano /etc/lightdm/lightdm.confAnd delete the # before these lines:
autologin-user=root
autologin-user-timeout=0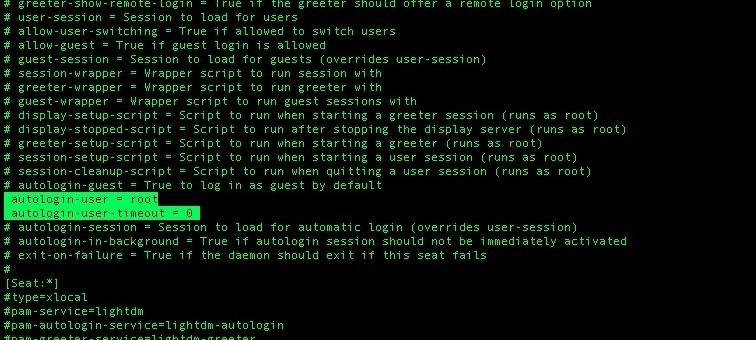
Save and exit with Ctrl X. Next, type:
nano /etc/pam.d/lightdm-autologinAnd you'll need to change this starting on line 11:
# Allow access without authentication
auth required pam_succeed_if.so user != root quiet_success
auth required pam_permit.so
To this:
# Allow access without authentication
###auth required pam_succeed_if.so user != root quiet_success
auth required pam_permit.so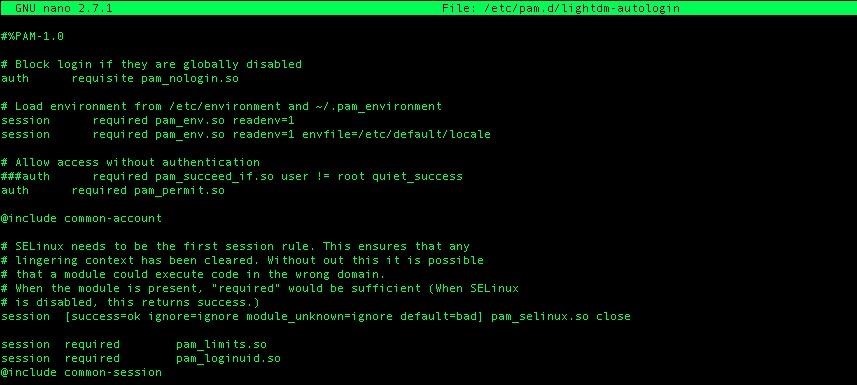
Save and exit, and type "reboot" into terminal to restart your Pi to test.
Test Your Build Against This Checklist
In order to be considered field ready, your device must pass this checklist:
- The device starts up, logs on without prompting for a password, and starts SSH at boot allowing remote access.
- The device connects to the command AP to enable remote control (does this by default after connecting the first time).
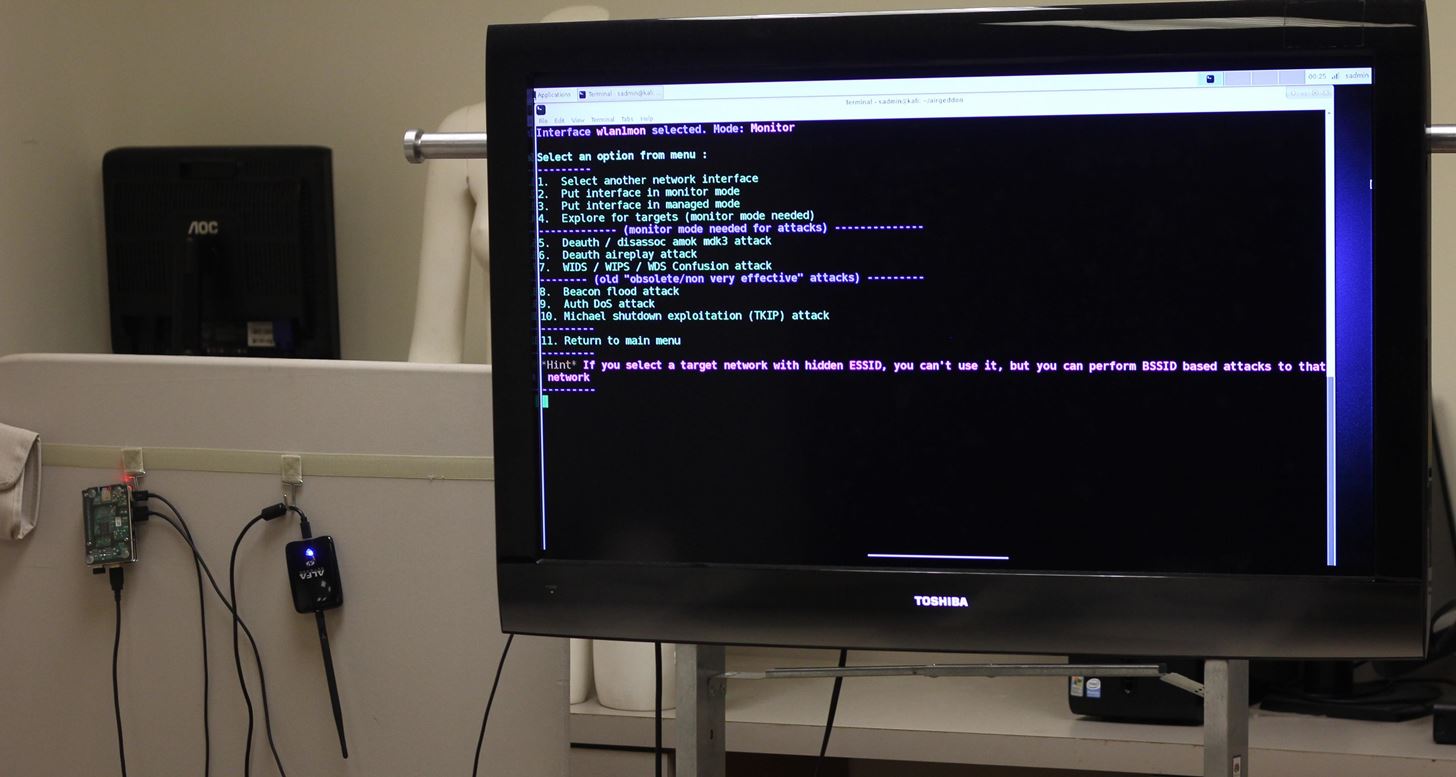
- Run besside-ng script on attack antenna to test packet injection (tutorial for this).
- The Pi can be shutdown without corruption to the data on the micro SD card (boots normally after shutdown).
Pass all the requirements? Then your Raspberry Pi is ready to hit the road. I'll be writing a series of Pi-based builds, so keep up with me by building your own Raspberry Pi-based Kali Linux computer.

Just updated your iPhone? You'll find new emoji, enhanced security, podcast transcripts, Apple Cash virtual numbers, and other useful features. There are even new additions hidden within Safari. Find out what's new and changed on your iPhone with the iOS 17.4 update.


114 Comments
Nice guide, such a powerful setup... anyway i've a question. What are in your opinion the benefits compared to a smartphone solution? I'm using an old dedicated smartphone with kali chrooted. I built a Rom with alfa and tp-link antenna support so i can plug these external wifi card... the monitor is onboard, the battery lasts hours, i've ssh and vnc services, external sd, i can plug usb and external hd too, i've lte connectivity, it fits in my pockets and it's more powerful etc...
Maybe the key is the external hardware modules you can use with a raspberry solution? Thanks for sharing!
The big benefit is price. At $35/pop they're practically disposable. Don't think of it as Smartphone vs RPi. Think of it as Smartphone AND RPi. And another RPi. And another... you get the point.
I am in South Africa and I want the device how can I get it and where?
Hello Snow Flake,
The advantage is twofold. One, they are like lego pieces. They are low cost and you can put them together with a huge variety of different probes, sensors, emitters, controllers, rocketry and explosives, all kinds of crazy shit. The Kali Pi is the gateway drug to both arduino DYI style hobbyist projects and Kali Linux hacking. It's easy to prototype hacking proof of concepts when you have this little thing that just works with most of your ideas.
Two, your build is a fingerprint. Less people have your admittedly excellent sounding build than run Kali on the officially supported Raspberry Pi, which makes it more difficult to determine who is using it. The more unique your build or style, the more you stand out. Are you buying a Raspberry Pi to make a laser toy for your cat? Or to launch fireworks to bombard a GPS location near a wireless AP every time it detects a specific user's device connecting to the network? The guy at the store doesn't care. By swapping out hardware and the SD card it'll do either.
Your build sounds cool, maybe we could share it in an article. You can find my PGP key on twitter @sadmin2001 if you'd like to get in touch about it.
Snowflake it would be great if you share us how you created a rom with those external card support.
I am having trouble installing Kali Linux , I have a x64 based pc with a 2 core intel processor. Trying to run/instal it via Vmware box from oracle. I keep getting either a kernel error or a not syncing error on both intalations of either 32 bit or 64 bit
Yeah, i understand your point Sadmin. For example could be interesting to add a couple of motors and control a cantenna with python from a comfortable gui interface while drinking a coup of coffee from the couch... Ok, you convinced me. How can i contact you?
1) search the PGP keyserver for "sadmin." I should be the first result, but if not, I'm the one that's not @zoldkertesz.com.
2) Shoot me an email, encrypt it with my public key
3) Tell me about your excellent build
4) Compare the PGP fingerprint against my twitter profile to ensure it's me you're talking to
Oh, and add your PGP key to the key server so I can reply. Thanks!
Have you tested this with a Pi 3 Model B? I've been having a bit of trouble with kali not working with the built in bluetooth on initial boot. My mini keyboard is bluetooth, but no dongle just want to connect to on board bluetooth. Any help on this? Otherwise, all good!
Updated: Original post was in error about the wireless card not working. This is more accurate to what I'm trying to accomplish.
Sorry for the delay, you're attempting to connect bluetooth directly to a keyboard? I've just been using one with a USB reciver, but I like your idea. Try Re4son's kernel a try, it enables bluetooth and Wi-Fi. The link is https://whitedome.com.au/re4son/sticky-fingers-kali-pi/ but the website is currently having some issues. I've used it on the Pi Zero W and it got things up and running quickly, but haven't tried what you're looking to do.
need some help can you help me how to dm you
I followed your instructions verbatim but it seems that my Raspberry doesn't login in automatically to root....any ideas??
Hey Jason
Fuck yes I've got some ideas, we're going to get this shit solved. Thank you for reading my tutorial and congratulations on getting Kali set up, the Pi can do a lot of fun stuff. But not if it's stuck waiting for a login each time.
Have two solutions for you. One, run
Drop my lightdm file in over yours. I took it directly out of the beating heart of my Pi.
If that doesn't work, tell me, and then follow these steps:
Nano /etc/lightdm/lightdm.conf
Untab #:
autologin-user=root
autologin-user-timeout=0
Save and exit
Nano /etc/pam.d/lightdm-autologin
Paste over line 11:
# Allow access without authentication ###auth required pamsucceedif.so user != root quietsuccess auth required pampermit.so
Save and exit, reboot.
If it works, take a picture of your Pi running and post it, I'd love to see it! Then go hack some stuff.
If it doesn't work, shake it a little and try again. Then reflash the card from a different file, like Rea4on's kernel.
https://whitedome.com.au/re4son/
SADMIN
My pi wouldnt auto login, and i copied ur very own auto login script and it still doesnt work. I checked the lines to-be-changed and they are all as you taught. What is the problem and how can i solve it??
Thanks
The file @SADMIN uploaded was for nano /etc/pam.d/lightdm-autologin not for Nano /etc/lightdm/lightdm.conf which be causing some confusion.
I'm having the same issue as Jason with no autologin in listed in my lightdm.conf.
Also the file you shared from your Pi doesn't look anything like the screen shots or what my lightdm.conf file looks like.
Very good and clear tutorial. Works fine.
Just wondering where the nex tutorial for this one is. I'd love to continue reading?!
More in the pipeline! Just published one for the Pi Zero and I'll be featuring some other great .img's for the Pi
So here is the deal, im a newbie and i have fallen in love with your website. Yesterday i ran out and got all the things i needed to start one of these. I got most of it done but i can not get it to autologin with the lightdm method provided so that i can pass the checklist. I have followed it step by step and have even been researching to try to understand it a tad better, i dont want to become a script kiddie and just plug and play but id really like to move to the next project from you site. Any help would be amazing! Love the site keep up the good work.
Don't worry, that's the hardest part and took me two days. Did you try the fix in the comments?
i tried the first one and it looked okay, but i may not know what im looking at. Again very new to linux. With the second method i get to the second step
"Save and exit
Nano /etc/pam.d/lightdm-autologin
Paste over line 11:
# Allow access without authentication ###auth required pamsucceedif.so user != root quietsuccess auth required pampermit.so
Save and exit, reboot."
And it says permission denied so this is where im stuck.
Run the command with "sudo" in front of it and tell me if it works
hi , is there any hacker can show me how to access a device with my Wi-Fi router and get any folder I want from it or get some format and send it for me?
ill be so thankfully for who show me that .
but I want it soon . some one connected to my internet(he/she connected to my Wi-Fi router) and get my data and said I have to pay money to save my data . I need to get him data and get my data back.
please.
can you help me?
See tutorials on:
Fing network scanner
Port scanning
Brute forcing ssh, ftp, or telnet with hydra
pay the xmr and quit using Windows learn
about internet security cause your fucked
Hello,
Thank you for this awesome tutorial. I have been looking for something nifty to do with my shiny new Pi 3 and this fits the bill perfectly.
I have followed everything to the letter (I hope), but ran into a problem connecting my phone via ssh. I am using ConnectBot off the google play store, and trying to connect the ssh through the built in Broadcom chip on the pi, and I plan to use an additional antenna for packet injection and such.
Using ifconfig, I grabbed the inet address of the Broadcom chip and tried connecting to that using ConnectBot (root@ipaddress). I managed to get past to the authentication prompt asking for root user password but after I press enter, I get a blank screen and a frozen cursor. The pi continues to work fine.
Thank you for your perfect how-to, I will be visiting your page in the near future for my next projects.
Cheers,
Chris
Hell yes Chris, thanks for trying it! I'm working with the creator of BerryBoot to make some new images for our community that are as simple as loading the image and selecting the distro you want to hack on, so that might solve some of your problems in the future.
For now, I recommend you first try to connect on a laptop or other device to see if the issue is with your phone hardware/software, or the Pi's SSH service. If it's the SSH service, uninstall and reinstall the SSH service and try again.
Hey, i just wanted to start off with saying that this is a great tutorial. i know this is probably kind of a dumb question but...
ive followed all the steps from the beginning with relative ease, up until the ssh server section. ive got the sever up and running on my Pi, but when i try to link my laptop up to it via the server, i have no commands to do so. do i need to install PuTTY or some sort of software on my laptop to even be able to tunnel to the thing in the first place? sorry if this is a very simple question that may have been asked before. im new to this stuff.
Hey! Yes, install PuTTY
This should help
And there are no dumb questions, if you are reading my stuff, I want to help you understand.
thank you very much!
Best you use mobaXterm on a Windows based machine. Much better integration and comes even with X integrated ;)
Hey ! Thanks for your job, that's incredibely helpfull. Unfortunatelly, I am stucked in step 7. I know my RPIs ip adress, i know the password i set BUT I have a error message telling me "access denied" and when i type "sudo service ssh status" on my rpi console, it simply tells me "failed password for root from 'my ip adress' port 'an other port than 22' "
What should I do?
I hope someone will understand my message, I'm french !
Thank you
Edit: There's also something else. Each time I reboot my machine, all settings are set by default (for exemple: my azerty keyboard). I think that's because I didn't set the sd persistance, is it?
Salut Raggastan,
What password combinations have you tried?
root - toor?
pi - raspberry?
if you set it to something crazy, you can always try reinstalling the SSH service. Can you log in when you connect it via hdmi?
bonne chance!
Merci for your answer!
root - password I set
I can login when I connect it via hdmi, I'll try again this morning (it's 10am in france) and i'll send you the results!
Thanks again!
Edit: command ifconfig send me back "bash: ifconfig command not found"
I've set "root-toor" as password combination, but I still can't connect to my raspberry ("access denied"). I've type "sudo service ssh status", everything seems ok, exept that it tells me i've enterred the wrong password. I'm very patient but this problem is quite long to resolve !
There's a critical mistake in the Kali linux update portion. I've borked my Kali linux twice and finally figured out that the process needs to go like this:
apt-get update
apt-get upgrade
apt-get dist-upgrade
Otherwise I get all kinds of errors and then I can't do anything after my desktop completely disappears.
I've updated this, I apologize for these borks that were done to you!
I have been trying to set this up now but ifconfig isn't recognized as a command and I cannot find out my raspberrypi ipadress. Any help would be greatly appreciated so I can get past step 7 thank you!
My computer also does not recognize ssh as a internal or external command. How do I fix that?
If you have access to the GUI, you can right click the internet icon (top right) and a drop down with "connection information" should be there, click that.
Here is the fixes to the two issues I encountered while following the tutorial.
First if you encounter the ifconfig error/ not found:
sudo apt-get install net-tools
Second if you're having issues with the autologin. Check the /etc/lightdm/lightdm.conf file there are two arguements for
autologin-user=root
autologin-user-timeout=0
scroll down farther to find the second set. That's what worked for me.
Thank you for this! I made a github fix for the autologin, but I'll add the net-tools for clarity.
It worked!!! Thanks!!
I got stuck with it for some time now, thank you. :)
Awesome! I'm happy to hear it's working
Thanks for this !
Very good article. Is this image compatible with Raspberry 7" screen ? If so, is there any configuration to modify ? Thanks !
Just got this all set up, not a single problem encountered.
Nifty tutorial.
Fuck Yeah, JohnDoe. That's what I like to hear.
So I had to format and start again ??
I connected a touch screen and it went to hell and I decided it would be easier to just start over
Is there a way for me to make a backup of sorts so that if this happens again I can just flash an image that's already configured?
YES. Welcome to my nightmare. Grab a backup with etcher or ApplePiBaker
https://www.tweaking4all.com/software/macosx-software/macosx-apple-pi-baker/
Ah,
Wouldn't know any windows tools would you? I just keep getting guides for making windows recovery images
Post pictures if you built it!!
I'd love to post pictures but I was never able to get the screen to work XD
I tried a bunch of shit, my guess is bad screen.
Even using Re4son's kernel?
Alright, maybe I need to do a guide on getting a touchscreen version working
I'm very new to this - say I do this, what exactly can I do with it? Are there options or something? Sorry if it seems noobish, as I said I'm very new but curious to learn.
You can load many different types of operating systems, like Kali Linux and ParrotSec. Take a look at Kali Linux and see all the things you can do with it.
SADMIN
I tried to run fluxion on my pi,
and it return:
The script should be exected inside a X (graphical) session.
So how can i use it via SSH?? How can i solve this problem??
Thanks
You must use vnc, not ssh. Fluxion is a multi bash script, meaning it must open many windows
Is VNC installed and started by default ?
No, you must set up VNC yourself to connect to it. Otherwise, you can connect via HDMI for a graphical session
Well, I kinda lied.
I had to manually re size the partitions as the resize command did nothing,
I got it the first time but repeating that task is not going well lol
Edit
When changing the partitions, make sure to use the correct starting value...
I apparently chose default ;P
Wonderful tutorial!
A perfect tutorial once again sadmin, maybe one of the best all across null byte?
i set this up and it works flawless! Still a bit new to the scene and i guess i dont really know exactly EVERYTHING i can do with it as of now, but it is a very fun project!
i have a question tho, wouldn't there be any other way to connect to the PI, maybe using netcat? using secure shell you have to be in the same network (maybe with netcat too?) but i just thought maybe there is some other way to do it.
anyways, great tutorial and thanks for helping the community :)
Thank you for the great tutorial! Could you name a model of projector? Thanks in advance
Just released the first version of a Pi image designed specifically for this sort of portable hacking. Check it out at http://thesonicpi.weebly.com/
Comes with a pre-configured access point, a custom built web app for easy management, and SSH already setup for complete control from a phone, tablet, or laptop
Awesome tutorial, I was able to set it all up and get it working. One thing that is not mentioned though is whether there are any further steps required to set up ssh for the second user that was created. I can ssh with root but not with the second user. Did I set something up incorrectly?
It's really great tutorial!
But i am having a trouble with autologin thing.
I tried even downloading Sadmin's file, i tried to manualy edit it but no luck.
Anyone had more luck than me?
If so, please do tell how did you do that.
Thank you for your amazing tutorial!
But I have problem on autologin part.
I followed all the steps exactly but the auto login part does not work.
I tried the method you posted on comments but it still does not work.
Is there an other way?
What about pre-configuring (setting up the wi-fi adapter to auto-connect to a network it's never "seen") the Headless Kali-Pi for "long-endurance reconnaissance or continuously powered operations." My guess is you would need to do something like this
This was a very helpful tutorial. I had a couple questions that I hope weren't asked up above:
1) How disable the "screen saver" that comes up when you haven't done any typing for a while. In my case you need to put in login and password to get back to site which is difficult when 'headless'
2) How are people migrating 'results' over to a faster machine to run a password find?
I have been trying to install aircrack-ng-1.1 on my Mac just for cracking and can't get going. Although I do have hashcat up on the Main which is almost as deep as metasploit.
Any help would be greatly appreciated. And thanks for the tutorial. I had no problems
First off, very awesome tutorial! I've built this Pi setup to spec, and paired it with a panda Pau05 wireless card. When I run the "besside-ng" script, I get a "crappy connection 100% loss" error on everything I scan, even when the Pi and network card are sitting right next to the target router. I've even tried an Alfa wireless setup, with the same problem. I'm able to put both cards in monitor mode manually, so I know the cards are connected properly.
I've set up a Kali Live with Persistence USB, and used either antenna on that with fantastic results. So I'm wondering if I've missed something in the raspberry Pi setup, even though I'm fairly certain I've followed the tutorial fairly closely.
Again, great tutorial sadmin! Love the idea of a tiny linux box with pen-testing capacity.
Hello,
thanks for this great tutorial, I just built my own RP Pi3 with 7" screen and everything is going fine till the wifi adapter.
I bought the Alfa AWUS036NHA , plugged into the Pi3 but no one light blinks on the device. I tested on a Windows PC and it is working fine.
if I do "ifconfig" it shows only the onboard wifi card wlan0, and if i do "iwconfig" the alfa card doesn't shows up neither.
Any idea?
Hi,
I have the exact same problem with the TP-link TL722N. I followed the awesome guide (thank you) and ordered the TP-link to play around with aircrack. But I can't get the Pi to recognize the usb wifi adapter. It does recognize 'a' device in 'lsusb' and I tried to install the drivers that for the corresponding Atheros chipset in the adapter, but nothing.
Any ideas?
Thank you!
So I saw some questions about this above but I wanted to be more specific about it- Is there a good solution for tools like drift net or wireshark where the output can't be exclusively text? Is VNC the only solution?
I finally got it to auto login, but I have to hit CTRL+D during the bootup process and THEN it will auto login. Anyone have any ideas on the fix?
I'm having issues with downloading the Linux. As I ran the dd command, and hit CNTRL T literally no changes were applied the the drive. It labeled the bytes added as 0. Any solutions?
As someone who is very new to all this, I'd just like to add that you need to get xz to uncompress the kali linux ARM image before continuing with any of the other steps, otherwise it won't work. Kudos to SADMIN for this excellent guide.
At present, my wifi adapter is still in the mail, and I am trying to connect to a wifi network using the Pi3's internal Wi-Fi. Unfortunately, the following has not happened":
At the top right of the desktop, you'll see an option to connect to a nearby wireless network.
Does this mean I have to wait for the wireless adapter to arrive before I can connect to the internet? All I can see in the top right corner is something that looks like a little yellow thunderbolt.
Is there anyway that I can connect to my home network using the terminal? Sorry for all these questions, I am a complete beginner, but I think they may be helpful for other people who encounter the same difficulties.
Don't really know why it worked but I'll write down the fix here in case anyone else gets stuck like I did:
simply use the addusser command in terminal to create a new account and reboot. When you login as the new user for the first time, click the window that says default configuration, DONT click the one that says blank panel.
Really awesome tutorial! I got it all set-up in one go! I'm not sure if this is a noob question, but I cannot for the life of me get my phone to SSH into the Pi. I'm trying to use my iPhone's hotspot so I can go out testing. I have my Pi connected to the hotspot on my phone and then when I try to SSH into the Pi using an app on my phone it always times out. Any help would be great! Thanks again for the awesome tutorial!
Hei, may I ask you what's the little green keyboard's brand? Thanks
It's not green, but you can find it on ebay: https://www.ebay.com/itm/Mini-Wireless-Bluetooth-Keyboard-and-Mouse-Combo-with-Touchpad-for-Raspberry-Pi/172356997651?epid=1987323612&hash=item2821471213:g:vfkAAOSwmfhX66-~
Hey I NEED HELP! I can get my mac to recognise and find my pi but it asks me for a password and i have no idea what one please help!!!!
Enter "toor" as password
I'm now up to STEP 7. On a Mac running iTerm, I type ifconfig and I see a list similar to in the tutorial. However, when I type ssh root@10.0.1.6I get the following error:
ssh: connect to host 10.0.1.6 port 22: Connection refused
I installed arp-scan with Homebrew, but I couldn't really understand the man pages. Can anyone give me a nudge in the right direction? Much appreciated...
I've followed all of the other instructions with regards to the lightdm.conf and lightdm-autologin files, and the Pi is now able to log in without a password. However, when I try the ifconfig command, I am still getting the errors listed in my original post, i.e.
ssh: connect to host 10.0.1.6 port 22: Connection refused
ssh: connect to host 10.0.1.6 port 22: Connection denied
could it be because I am running El Capitan and not Kali on the command machine?
Hi, I'm pretty new here and quite a noob.
I've gotten myself a Raspberry Pi 3 recently and tried installing Kali Linux. I went to the "offensive security" homepage to download the iso for the raspberry pi, flashed it onto a sd card and put it into my raspberry pi.
Everything boots up perfectly normal.
But once I try to run "apt-get install gparted" or any other other extension than gparted or even only when I run "apt-get install upgrade" my system donwloads all the stuff but when unpacking it suddenly shuts down. When I reboot it, it reboots perfectly fine but once I try to use "apt-get upgrade" again it says "dpkg was interrupted, you must manually run 'dpkg --configure -a' to correct the problem. Once I do this, I get the following Error: "failed to open package info file '/var/lib/dpkg/updates/0400' for reading: Structure needs cleaning".
Things I already tried:
Can't seem to get it working. I'd really apreciate if someone can help me !
Do I need a wireless adapter and C2 card with raspberry pi 3 model b??
Fantastic tutorial. When I boot the Pi, it gives me the login screen- it doesn't log in and I can't ssh in. Once I log in via hdmi, an IP shows up on the network and I can log in. I double checked the files to edit. What else can I do?
Re-check the instructions once more. I had this problem but got it solved after.
Great setup, immediately went to get mine.
I got some errors on the VNC viewer though.
Great set-up but the tactical set up is bogus in my mind. When on the go, there is no way to connect to a "friendly" AP without first going through network manager and choosing one out. SSHing into the device is impossible and your stuck. Even with network configs changed so that the Rpi auto connects to any open AP's, if your ever in a new environment, you are option-less and hopeless.
Is iPad 1 Good For Hacking??
I like many readers could not initially get the Autologin to work by following the tutorial as it is written. Thank's to the person that pointed out that there are two instances in the first file that must be uncommented in order for it to work. Thank you very much for pointing that out. It finally worked for me also once making those changes. In the Tutorial, we make a new user with root permissions, so shouldn't that be what we use instead of root from that point on?
First off, great article. Sorry if you already have something posted but I have been looking everywhere. Got it all set up according to your post (few minor changes to the auto login ) but I have been fighting between this setup and adding vnc according to other sites.
It has been two steps forward one step back the whole time, get vnc working and it breaks something here or I get auto login working again and it breaks something there. Long story short, do you have vnc currently working with this build.
Nevermind, finally got it working via https://raspberrypi.stackexchange.com/questions/60874/tightvncserver-displaying-grey-screen-on-kali-linux-upon-vnc-connection
Thanks again for the tutorial
Hello. Newbie here. I still can't get past my root login after doing all the instructions from "Configure Autologin for Headless Operation". Anyone else have the same problem?
There are 2 instances of the following in the file that you have to remove the # to uncomment them. Make sure you get both and it should work. The 2nd instance is near the bottom of the file if I remember correctly
autologin-user=root
autologin-user-timeout=0
Why can't I even try to access the OS? The console always says that it couldn't mount root faster. Does someone know how to fix this?
Hi Guys,
Bit of noob but been at this for a couple of evenings now and when i'm trying to connect via SSH i keep getting the message of:
ssh: connect to host IP ADDRESS port 22: connection timed out.
Anyone had this issue yet or does anyone know a fix please?
This is a great tutorial, but I've been having an issue that I can't find the solution to anywhere.
My issue is that no matter how I flash the .img to any micro sd, the Pi always refuses to boot to anything other than the rainbow square, with the green light flashing repeatedly. I have used the same methods on the same sd cards to install Raspbian and RetroPie which both worked meaning it must be something to do with the Kali img. I have downloaded it multiple times to no success. Any help would be greatly appreciated.
Are you certain that you're downloading the ARM image and not 32/64 bit Kali Linux images for laptops/desktops? (At first I couldn't figure out where to find an ARM image as it's not offered on the Kali.org site, but rather, it is on Offensive Security site!
offensive-security.com/kali-linux-arm-images/
Have you partitioned the SD card you plan to use for installing the Kali ARM image? The rainbow square thing, if I'm not mistaken, isn't that from the default Pi distro, called "NOOBS" or whatever? I think this was the easiest part of the whole installation part, towards the end it gets a little confusing... ha-ha!
If anything, there are more flavours for your Pi - as far as I'm aware, ones that are similar to Kali Pi are Sonic Pi and DietPi
thesonicpi.weebly.com
dietpi.com
So my issue is that when I set everything up I always have to kill the interfaces so it will run thus making it so I can't reconnect remotely. How do you get around this issue?
sadmin,
Can you set the raspberry pi with a password?
in regards to number 2 on your checklist: The device connects to the command AP to enable remote control (does this by default after connecting the first time); how do we connect to the kali pi when its out int he field if we do not know its IP address? Or i guess a better question: how do you know your Kali pi's ip address out in the wild?
Nice Setup! I wonder my RPi3 uses the TP-Link USB Stick as default Wifi card. But I wanna use the internal Wifi for connecting with AP (my phone hotspot) so that I can use the TP Link stick in monitor mode instead whenever needed.. Is there a way to keep wlan0 (internal wifi) as default Wifi connection?
You just need to connect to your AP with internal wifi hardware. I done that and it looks like than in my case:
Hope that helps!
Getting the autologin feature to work properly took quite some tinkering and looking up other sources as well; the splendor of having the ability to do this, is quite enticing, I suppose! ;)
I realize this article is a year old, but I've followed these instructions to the letter multiple times...even searched out other resources that pretty much say the same thing and it just does not work for me.
I'm still getting a log in screen.
None of the tips above work either.
Has something changed in the latest version of Kali?
Although this article is over a year old, it still seems to be the foremost authority on this topic. These are amazing, super helpful instructions! I'd only like to recommend a few updates:
Thank you, SADMIN!
If you'r installing kali linux on a raspberry pi 3b+ when does it need to be plugged in?
This tutorial need to be updated with new nexm0n re4son kernel has already compiled everything.
step 5 sub step 2 dpkg-reconfigure openssh-server returns an error.
Step 8 sub step 3 nano /etc/lightdm/lightdm.conf following path does not exist or file does not exist to perform editing "#"
My raspberry pi is "Linux kali 4.19.66-re4son-v7+ downloaded from kali offensive security websit.
Hey Kody please update this or if already done please redirect people to updated tutorial. Sorry if I was disrespectful in anyway I want to keep my post short & be straight to point.
Hi, I am having a hard time making it to work, I am using the new img version 2020 and user is "kali", will that change everything with this setup or it should be fine?
Hi, I have a bit of a problem making it work. When connected to a display it is able to auto login and connect to wifi. But when I take the display off, I can't even find the device. I have used advanced ip scanner to scan for the devices but I can see literally nothing. Can you please help me this?
Looking at these other posts I'm wondering if it's worth posting here as I doubt anyone will see it. But anyway, It's a great subject, as usual from Null Bytes.
I have a question, how do you connect to the Raspberry pi once it's in monitor mode to make adjustments during a scan? What would be a better idea is to have the Pi text or email you if the ALFA card (that's my card btw) drops out of monitor mode for some reason. Then you could stop and have a look at the pi to remedy the problem instead of carrying on and finding when you got home you only had a partial scan instead of a full one.
Share Your Thoughts