Virtual Users And Domains With Postfix, Courier, MySQL And SquirrelMail (Debian Squeeze) - Page 4
This tutorial exists for these OS versions
- Debian 7 (Wheezy)
- Debian 6 (Squeeze)
- Debian 5 (Lenny)
- Debian 4 (Etch)
- Debian 3.1 (Sarge)
On this page
12 Test Postfix
To see if Postfix is ready for SMTP-AUTH and TLS, run
telnet localhost 25
After you have established the connection to your Postfix mail server type
ehlo localhost
If you see the lines
250-STARTTLS
and
250-AUTH LOGIN PLAIN
everything is fine:
root@server1:/usr/local/sbin# telnet localhost 25
 Trying 127.0.0.1...
 Connected to localhost.localdomain.
 Escape character is '^]'.
 220 server1.example.com ESMTP Postfix (Debian/GNU)
 ehlo localhost
 250-server1.example.com
 250-PIPELINING
 250-SIZE 10240000
 250-VRFY
 250-ETRN
 250-STARTTLS
 250-AUTH LOGIN PLAIN
 250-AUTH=LOGIN PLAIN
 250-ENHANCEDSTATUSCODES
 250-8BITMIME
 250 DSN
 quit
 221 2.0.0 Bye
 Connection closed by foreign host.
 root@server1:/usr/local/sbin#
Type
quit
to return to the system shell.
13 Populate The Database And Test
To populate the database you can use the MySQL shell:
mysql -u root -p
USE mail;
At least you have to create entries in the tables domains and users:
INSERT INTO `domains` (`domain`) VALUES ('example.com');
 INSERT INTO `users` (`email`, `password`, `quota`) VALUES ('[email protected]', ENCRYPT('secret'), 10485760);
(Please take care that you use the ENCRYPT syntax in the second INSERT statement in order to encrypt the password!)
If you want to make entries in the other two tables, that would look like this:
INSERT INTO `forwardings` (`source`, `destination`) VALUES ('[email protected]', '[email protected]');
 INSERT INTO `transport` (`domain`, `transport`) VALUES ('example.com', 'smtp:mail.example.com');
To leave the MySQL shell, type
quit;
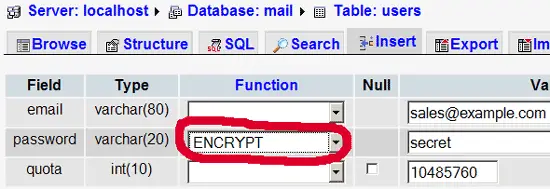
For most people it is easier if they have a graphical front-end to MySQL; therefore you can also use phpMyAdmin (in this example under http://192.168.0.100/phpmyadmin/ or http://server1.example.com/phpmyadmin/) to administrate the mail database. Again, when you create a user, go sure that you use the ENCRYPT function to encrypt the password:
I do not think I have to explain the domains and users table further.
The forwardings table can have entries like the following:
| source | destination | |
| [email protected] | [email protected] | Redirects emails for [email protected] to [email protected] |
| @example.com | [email protected] | Creates a Catch-All account for [email protected]. All emails to example.com will arrive at [email protected], except those that exist in the users table (i.e., if [email protected] exists in the users table, mails to [email protected] will still arrive at [email protected]). |
| @example.com | @anotherdomain.tld | This redirects all emails to example.com to the same user at anotherdomain.tld. E.g., emails to [email protected] will be forwarded to [email protected]. |
| [email protected] | [email protected], [email protected] | Forward emails for [email protected] to two or more email addresses. All listed email addresses under destination receive a copy of the email. |
The transport table can have entries like these:
| domain | transport | |
| example.com | : | Delivers emails for example.com locally. This is as if this record would not exist in this table at all. |
| example.com | smtp:mail.anotherdomain.tld | Delivers all emails for example.com via smtp to the server mail.anotherdomain.com. |
| example.com | smtp:mail.anotherdomain.tld:2025 | Delivers all emails for example.com via smtp to the server mail.anotherdomain.com, but on port 2025, not 25 which is the default port for smtp. |
| example.com |
smtp:[1.2.3.4] |
The square brackets prevent Postfix from doing lookups of the MX DNS record for the address in square brackets. Makes sense for IP addresses. |
| .example.com | smtp:mail.anotherdomain.tld | Mail for any subdomain of example.com is delivered to mail.anotherdomain.tld. |
| * | smtp:mail.anotherdomain.tld | All emails are delivered to mail.anotherdomain.tld. |
| [email protected] | smtp:mail.anotherdomain.tld | Emails for [email protected] are delivered to mail.anotherdomain.tld. |
See
man transport
for more details.
Please keep in mind that the order of entries in the transport table is important! The entries will be followed from the top to the bottom.
Important: Postfix uses a caching mechanism for the transports, therefore it might take a while until you changes in the transport table take effect. If you want them to take effect immediately, run
postfix reload
after you have made your changes in the transport table.
14 Send A Welcome Email For Creating Maildir
When you create a new email account and try to fetch emails from it (with POP3/IMAP) you will probably get error messages saying that the Maildir doesn't exist. The Maildir is created automatically when the first email arrives for the new account. Therefore it's a good idea to send a welcome email to a new account.
First, we install the mailx package:
apt-get install mailutils
To send a welcome email to [email protected], we do this:
mailx [email protected]
You will be prompted for the subject. Type in the subject (e.g. Welcome), then press ENTER, and in the next line type your message. When the message is finished, press ENTER again so that you are in a new line, then press CTRL+D; if you don't want to cc the mail, press ENTER again:
root@server1:/usr/local/sbin# mailx [email protected]
Subject: Welcome <-- ENTER
Welcome! Have fun with your new mail account. <-- ENTER
<-- CTRL+D
Cc: <-- ENTER
root@server1:/usr/local/sbin#

