Speed Up and Secure Your Computer with CCleaner

We all want to keep our computers in tip-top shape. Today we’ll show you how you can use CCleaner to get the job done.
We all want to keep our computers in tip-top shape. There are many things you can do, like clear browser history and cookies, find and delete duplicate files, uninstall software you’re not using, manage system restore points to save some hard drive space, and analyze your hard disk space to see where else you can save space. You can also securely wipe the free space on your computer and update programs so you have the latest security fixes.
CCleaner is a free tool that allows you to do all this in one easy-to-use tool. Today we’re going to cover the features available in this handy tool.
Install CCleaner
Download CCleaner and then run the installer file. You can also download a portable version of CCleaner, if you’d rather not install the program.
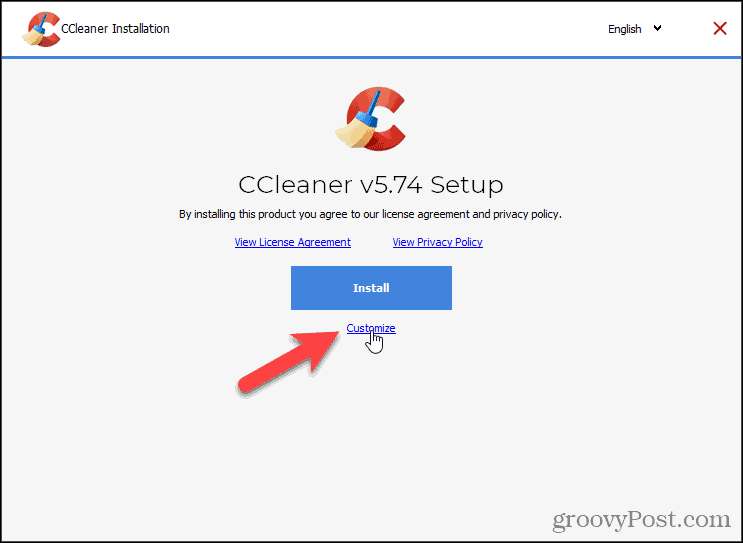
Before you install CCleaner, you may want to set some options. To do this, click Customize.
By default, all the Install Options are selected. Uncheck what you don’t want.
Intelligent Cookie Scan allows you to keep cookies for websites you often login to. CCleaner has a list of specific sites it scans to add to the list of Cookies to Keep (discussed later in this article). If you don’t like their list, uncheck the Enable Intelligent Cookie Scan box on the Install Options dialog. You can always the cookies you want to keep later in the Options.
For additional options, click More.

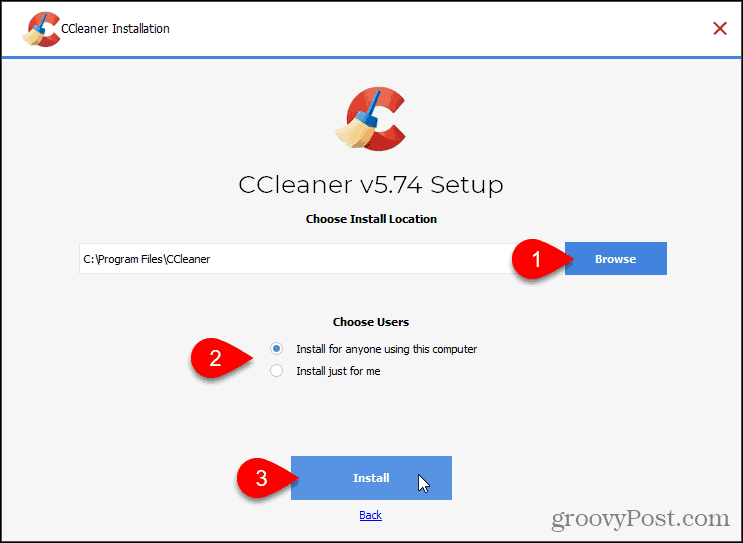
To install CCleaner to a different location, click Browse under Choose Install Location and select a location. We recommend accepting the default location.
Select which user or users for which you want CCleaner available under Choose Users.
Then, click Install.
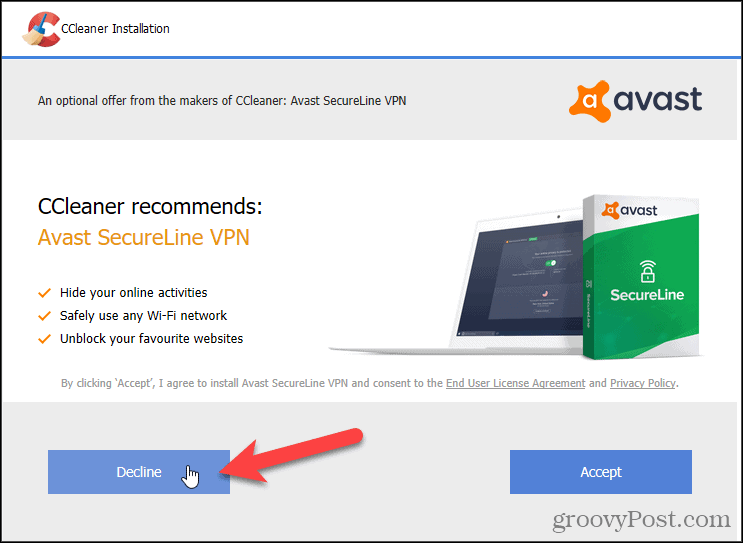
The company that makes CCleaner also makes a Virtual Private Network (VPN) program that they would like you to use. We don’t recommend installing this VPN, so click Decline. You don’t need to install it to use CCleaner. If you are looking for a VPN check out something like Private Internet Access PIA.
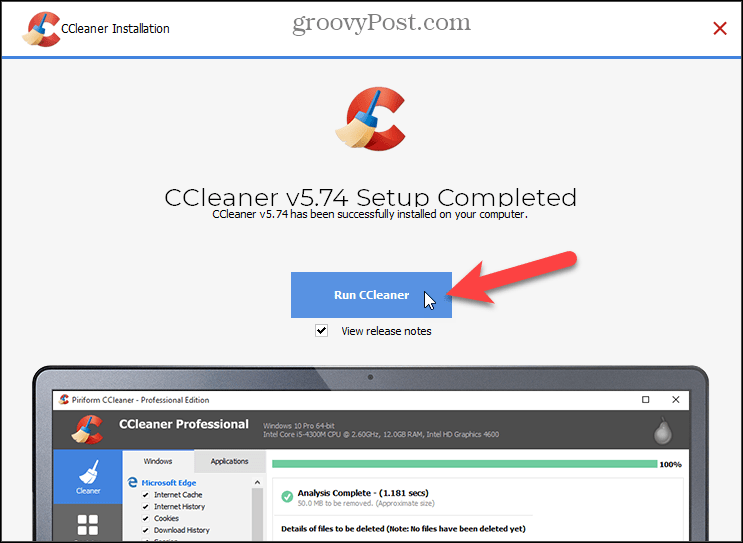
If you don’t want to view the release notes when the installation is finished, uncheck the View release notes box.
Then, click Run CCleaner.
Clean Browser and Windows Files
CCleaner allows you to get rid of unneeded files, settings, temporary files for web browsers, and other installed programs.
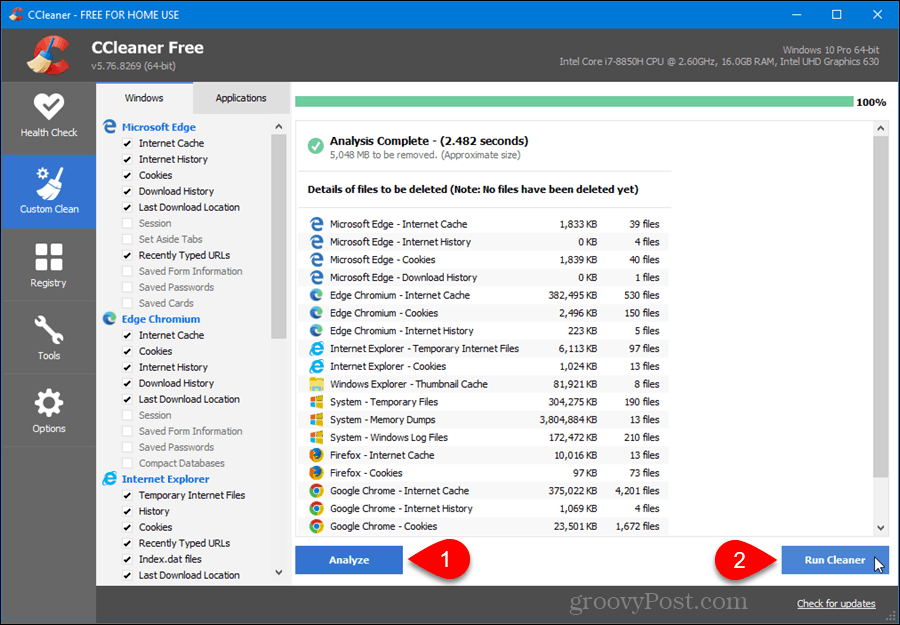
To clean your computer, click Custom Clean in the left sidebar. By default, CCleaner cleans a recommended list of data for Microsoft’s browsers on the Windows tab, in addition to Windows Explorer and System files and other more advanced items. Check and uncheck the boxes in each section of the Windows tab. You can also clean files in other browsers and applications using the Applications tab. Clicking the icon next to a heading either selects all or unselects all the items under that heading.
Click Analyze to see a list of the files to be deleted. If you have programs open you chose to clean, you’ll see a warning asking if you want to close the program to clean it. You can save this list to a text file by right-clicking on the list and selecting Save to text file.
When you’re ready, click Run Cleaner to begin deleting the files. You’ll see another list of the files that were cleaned.
Choose Which Cookies to Keep
Cookies are small text files that websites place on your hard drive. They contain information like a user ID, a session ID, or settings for websites you visit. Cookies allow you to quickly log back into websites or for websites to display pages using certain preferences saved in cookies from a previous visit.
It’s a good idea to periodically clear your cookies for privacy reasons, but be aware that you’ll have to log into websites again if you do and any preferences saved for websites will be lost. That’s where CCleaner is useful. You can specify which cookies you want to keep when you choose to clean cookies.
By default, CCleaner deletes all of the cookies for all of your Web browsers (Internet Explorer, Mozilla Firefox, Safari, Opera, etc.) when you run the Cleaner. However, you can specify certain websites in CCleaner for which you don’t want to delete the cookies, like your bank’s website.
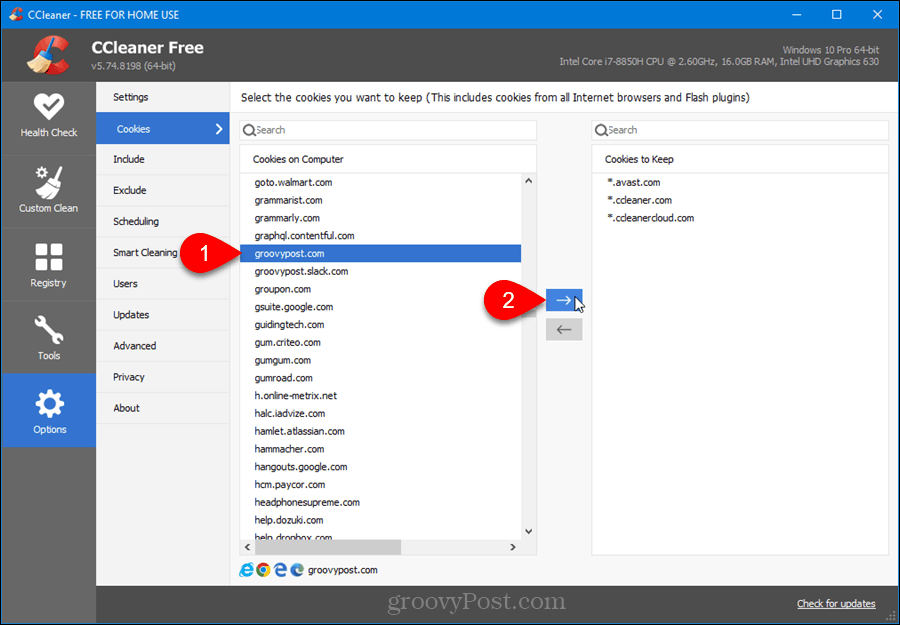
To select which cookies to keep, click Options on the left and then click Cookies. Select the cookies you want to keep in the Cookies on Computer list and click the right arrow in the middle to move them to the Cookies to Keep box. If you want to remove items from the Cookies to Keep box, select the items and click the left arrow in the middle.
If you have a long list of cookies on your computer, you can easily search through them for the ones you want to keep. Click the Search box and type a few letters in the cookie’s domain name. For example, type: groovy to find all the cookies for groovyPost.com.
To remove all cookies for certain browsers, click Custom Clean on the left, as discussed in the previous section. Check the Cookies check box on the Windows and Applications tabs for the browsers you want to clean.
You can also remove cookies from Firefox and do the same in Chrome within those browsers.
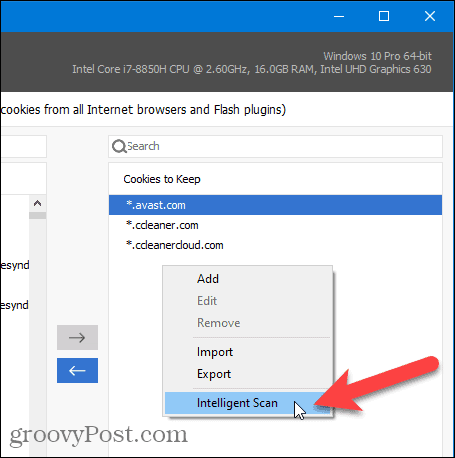
CCleaner’s Intelligent Cookie Scan adds some popular websites to the Cookies to Keep list. There’s a list of the websites that get added using Intelligent Scan on Piriform’s website. You may not want the cookies for all of these websites. But if you do, right-click anywhere in the Cookies to Keep box and select Intelligent Scan. Click Yes (Recommended) on the confirmation dialog to add the recommended websites to the Cookies to Keep list.
Use the Add option on the popup menu to add entries for websites you know you want to keep, but are not listed in the Cookies on Computer list. Select one or more cookies and select Edit to change them or Remove to move them back to the Cookies on Computer list.
You can also import a list of websites into the Cookies to Keep list using the Import option, listing each website on a separate line in the text file. Use the Export option to export the Cookies to Keep list to a text file.
Quickly Find Duplicate Files
The Duplicate Finder allows you to easily locate duplicate files on your computer. You may end up with duplicate documents, videos, music files, photos, or other files that are taking up space on your hard drive. With so many files on your hard drive, it gets hard to keep track of these files and know which ones are current.
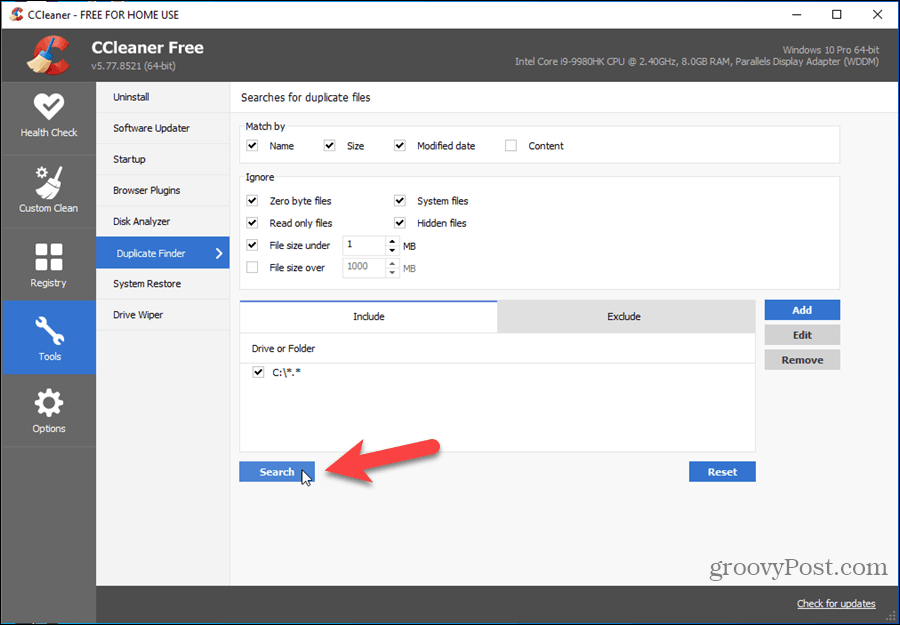
To find duplicate files on your computer, click Tools on the left and then select Duplicate Finder. In the Match by box, check the boxes methods to use to find the duplicates, such as Name and Size.
You can choose specific types of files to ignore when searching for duplicates by checking boxes in the Ignore section.
Use the Include and Exclude tabs and the Add, Edit, and Remove buttons to specifically include or exclude file types or files in a specific folder.
Once you’ve chosen your options, click Search.
The results display showing you the duplicate files, with the path, size, and creation date for each one allowing you to compare them. Check the boxes to the left of the files you want to delete and then click Delete Selected.
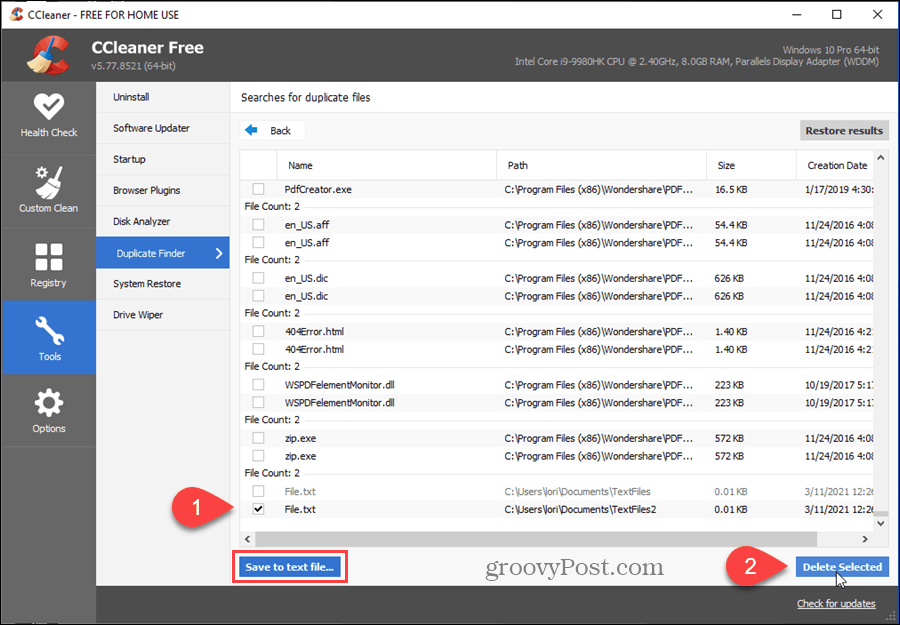
You can also export this list to a text file by clicking Save to text file.
Easily Uninstall Software and Generate a List of Installed Programs
If you’re running out of space on your computer, one method of freeing up space is to uninstall programs you’re not using. You can uninstall programs in Windows 10 using the Apps settings. However, CCleaner provides a faster and better tool for uninstalling, repairing, renaming, and deleting programs. One benefit of the Uninstall tool in CCleaner is that you can delete an entry from the list. This can be handy if a program didn’t uninstall correctly or if a program’s folder was deleted without uninstalling the program. Unlike the Windows 10 uninstaller, in CCleaner you can remove a program from the list.
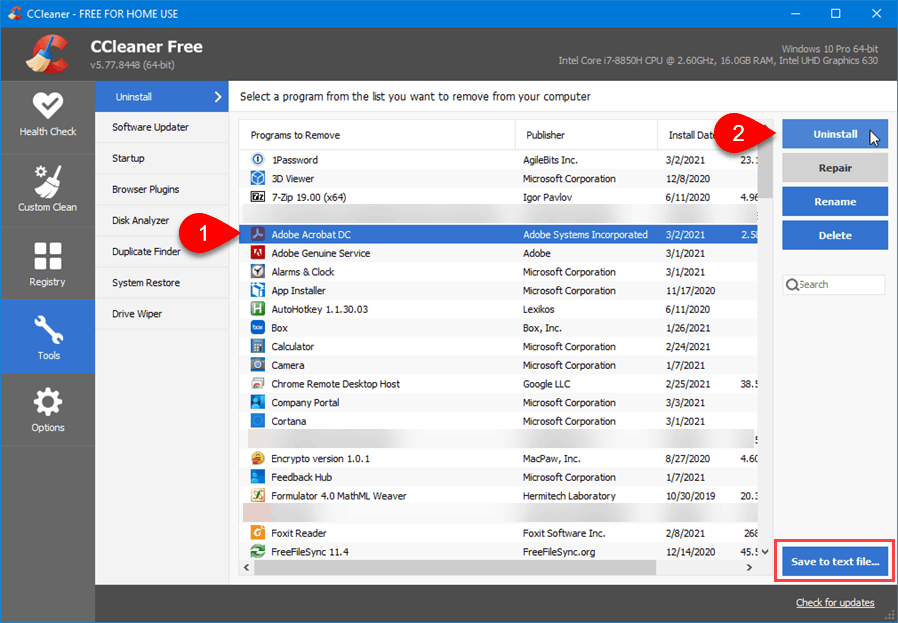
To uninstall an app, click Tools on the left. The Uninstall page should be selected automatically. Select a program in the list and click Uninstall. This runs the program’s uninstaller. If you have a long list of programs, you can quickly find the program you want using the Search box on the right.
You can also choose to Repair or Rename the program or Delete the program’s entry.
Another handy feature is you easily can generate a list of installed programs. Click Save to text file, specify a name and location for the file, and click Save.
Remove System Restore Points
System restore points in Windows allows you to take regular snapshots of system activity and crucial files. You can roll back Windows to an earlier date, if a program gets corrupted or you want to access a file that was available on that date, by going back to a specific system restore point. This restores Windows to the state it was in on that date.
System restore points are useful, but they can lead to privacy issues. If you’ve deleted files or uninstalled programs and a system restore point exists before that time, someone else can restore those files or programs from that restore point. CCleaner allows you to easily remove system restore points.
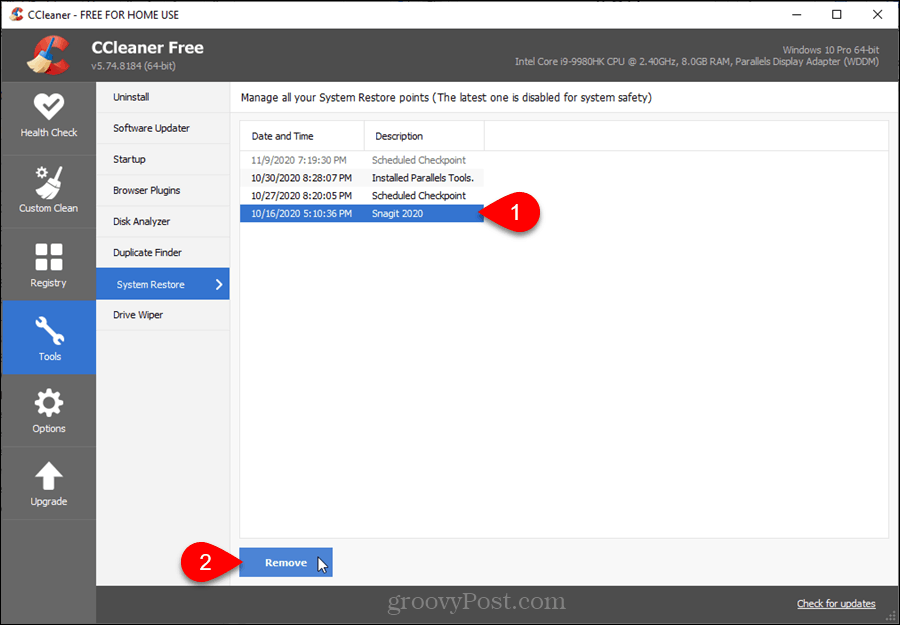
Click Tools on the left and then select System Restore. A list of the system restore points on your computer displays.
To remove a restore point, select the point in the list. Use Shift or Ctrl to select multiple points. Click Remove, and then click OK on the confirmation dialog that displays.
You can choose to have a system restore point generated automatically when you start Windows.
Manage Startup Programs
When you install a program, it may set itself up so it starts every time you log in to Windows. This can be handy, but you may not want certain programs to do that. If you have too many programs starting with Windows, it takes longer for Windows to start and the memory usage can be a problem, especially if you don’t have a lot of memory.
You can disable startup programs in Windows, but CCleaner has a handy tool for managing startup programs. This tool also allows you to delete programs from the list, which Windows 10 doesn’t allow you to do.
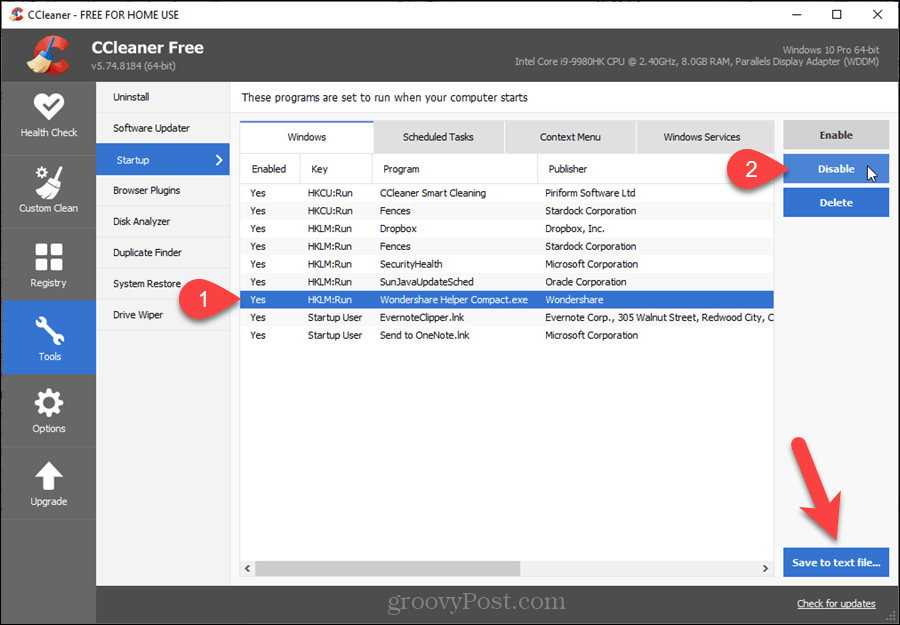
To disable or delete a startup program, click Tools on the left and then select Startup. Select the program you want to disable or delete. Use Shift or Ctrl to select multiple programs. Then, click Disable or Delete, depending on what you want to do.
Securely Wipe the Free Space on Your Hard Drive
When you delete a file in Windows, the data that makes up the file on your hard drive is not actually deleted. Windows just removes the reference to that file. This data will be overwritten over time as Windows writes new files to that area of your hard drive.
That means it is possible, with the right software, for someone to recover deleted data on your hard drive. Wiping the free space on your hard drive prevents the deleted data from ever being recovered. There are ways to securely delete files in Windows, (and on Mac), but CCleaner has an easy-to-use drive wiper tool.
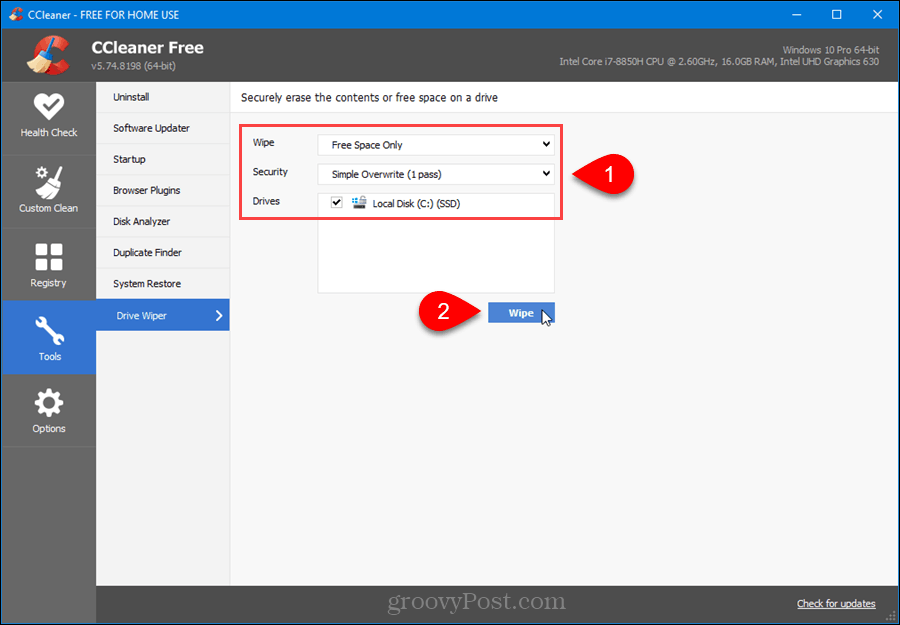
To wipe the free space on your hard drive, click Tools on the left and select Drive Wiper.
Select Free Space Only from the Wipe drop-down list.
Then, select the method of Security you want: Simple Overwrite (1 pass), Advanced Overwrite (3 passes), Complex Overwrite (7 passes), or Very Complex Overwrite (35 passes). The 3-pass method is the DoD 5220.22-M standard used by the Department of Defense. One pass should be enough, but if you want to be more secure, you can use the 3-pass method. The 7-pass and 35-pass methods will take a long time and is really more than you need.
The Drives box lists the C drive and any other drives connected to your computer. Select the drive (or drives) you want to wipe and click Wipe. CCleaner warns you before it starts wiping the free disk space.
You can also have CCleaner wipe the free space on your hard drive automatically when you run the cleaner, as we talked about in the Clean Browser and Windows Files section. Go to Custom Clean > Windows tab and check Wipe Free Space under Advanced. You’ll see a warning that selecting this option will take a long time.
Easily Update Software
The Software Updater tool in CCleaner scans your computer for outdated software and lists updates for them. It also lists your programs that are currently up-to-date.
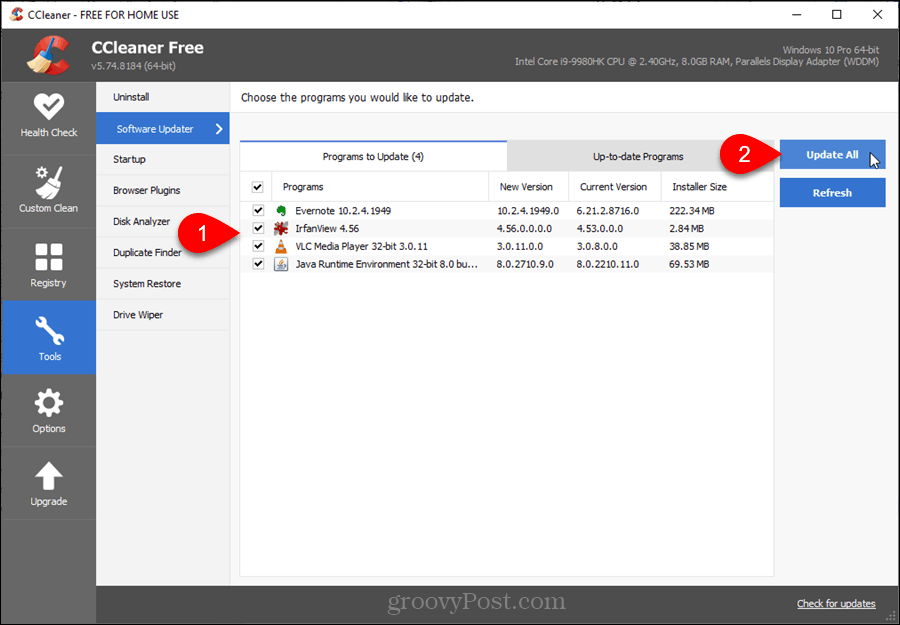
To find out which programs have available updates, click Tools on the left and then select Software Updater.
All the programs on the Programs to Update tab are selected by default. Uncheck any programs you don’t want to update. You may want to keep some programs at a specific version for various reasons.
Then, click Update All. CCleaner automatically downloads and installs the updates for the selected programs.
Click Refresh if to generate the list again.
Manage Plugins for Multiple Browsers in One Place
The Browser Plugins tool in CCleaner allows you to manage plugins, extensions, and add-ons for multiple browsers in one place. You can enable, disable, and delete multiple plugins at one time.
To manage your plugins, click Tools on the left and then select Browser Plugins.
Click the tab for the browser you want and use the Shift and Ctrl keys to select the plugins you want to change. Then, click Enable, Disable, or Delete on the right, depending on what you want to do.
You can also save a list of the plugins for the current tab to a text file by clicking Save to text file.

Find Out How Your Hard Disk Space is Being Used
You buy a computer with a nice big hard drive, thinking you have all this available space. Then, over time, you discover you’ve managed to fill the space and you don’t know what’s taking up all that space. There are ways to free up drive space on Windows and manage drive space on Mac. However, CCleaner also has an easy-to-use tool for analyzing what’s using up your disk space.
The Disk Analyzer tool in CCleaner allows you to see how storage space is used on your local, external, and network drives. It searches through all available drives and shows you what types of files are using up your storage space and how much each file type is using.
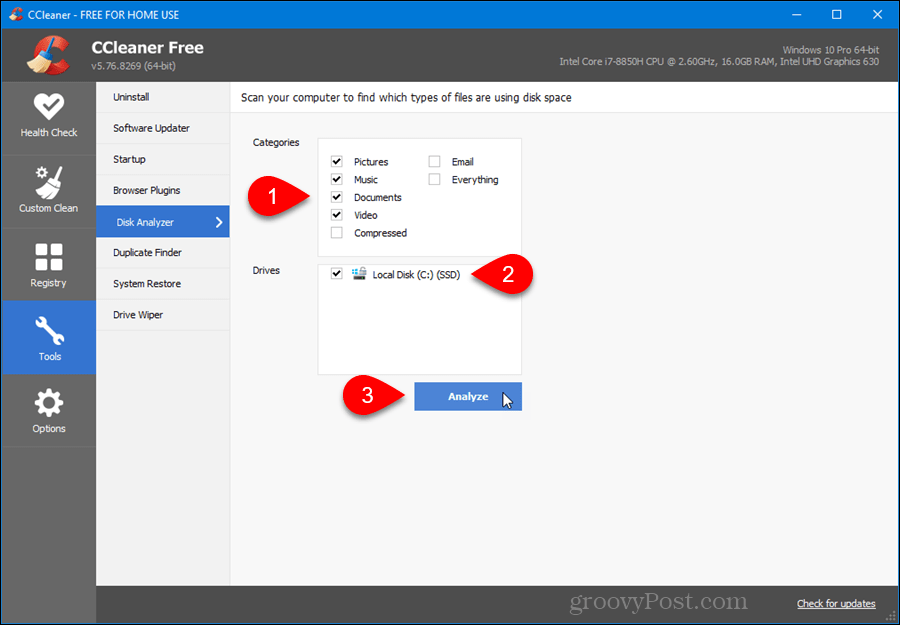
To use the Disk Analyzer tool, click Tools on the let and then select Disk Analyzer.
Select the Categories you want to include and the Drives you want to scan.
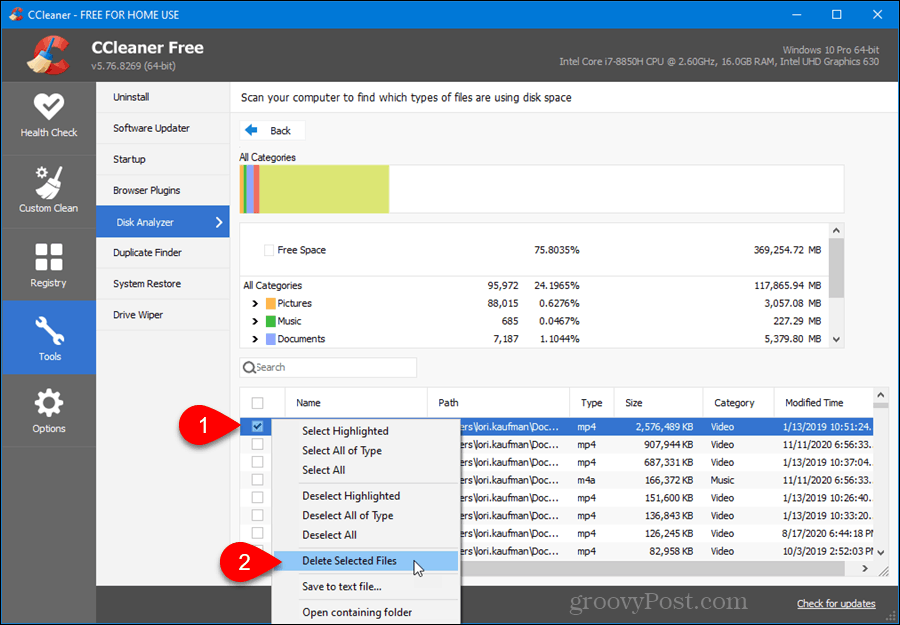
Use the checkboxes to the left of the items in the list of results to select which files you want to delete. Then, right-click on any of the selected files and select Delete Selected Files. You can also select and deselect files using the popup menu, save the list to a text file, and open the folder containing the file you right-clicked in File Explorer.
To sort the list, click on the column header by which you want to sort the list.
Clean the Windows Registry
CCleaner allows you to clean your registry. It scans the registry and lists the issues found.
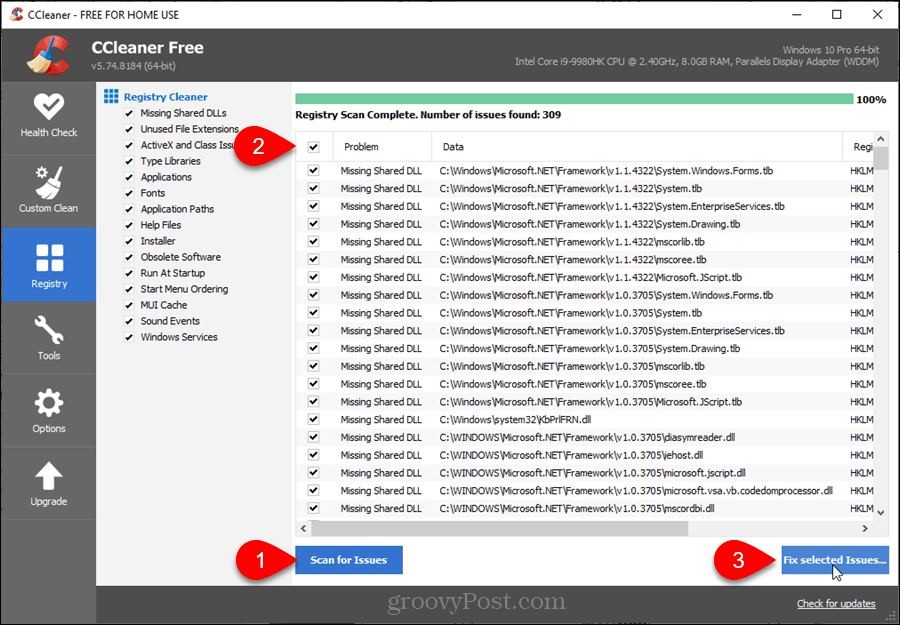
To scan and clean the registry, once you’ve backed it up, click Registry on the left. By default, all the items in the Registry Cleaner pane are selected. Click the checkboxes for any items you don’t want to scan for. Then, click Scan for Issues.
All the issues found are selected by default. Uncheck the ones you don’t want to fix. Or, to deselect all issues, click the check box at the top of the check box column. Then, check the boxes for the issues you want to fix.
To begin fixing the issues, click Fix selected Issues.
Features Available by Purchasing the Pro Version of CCleaner
If you decide to purchase the Pro version of CCleaner, you get the following additional features as compared to the free version:
- Monitor junk files in real-time.
- Schedule CCleaner to automatically clean your PC.
- Automatically clear history when you close your browser – You can do this in each browser automatically also by changing a setting.
- Manage multiple or select users.
As of the writing of this article, CCleaner Pro is on sale for $19.95.